Learn From the Dental Industry's TOP LEADERS!

Sit Chairside with
Dr. Dennis Wells
Creator of
DURAthin® Prepless Veneers
- OR -
Larry Rosenthal
Sonia Leziy
Michael Koczarski
Henry Gremillion
JUST TO NAME A FEW!
Register for a PREMIUM membership and learn from the best in the industry!
|
Making Smile Design Profitable, Efficient and Predictable
Part 2 - The preparation sequence.
Instructors:
Trent Smallwood, DDS
Trent Smallwood, DDS
Trent W. Smallwood, DDS, founded the Centre for Contemporary Dental Concepts in Tempe, Arizona in 1997. An International Speaker, Dr. Smallwood has spoken at Prestigious Venues such as the ADA, AACD, ACE, London Society, India, and throughout the country at state conventions.
In this section the CE course, Dr. Trent Smallwood demonstrates the preparation sequence and discusses the keys to success.
COS103 Video 2 Transcript
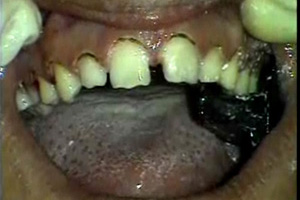
So to begin, because tooth number 9 needs the most reduction because of its position slightly facial, we will do a full reduction on the incisal third, the mid third extending almost inter-proximal and then the gingival third. Lateral incisors will typically have two but the three planes of reduction, the incisal which you can see here, the mid body, and then the gingival all very critical all the way through the prep sequence. When preparing teeth I attempt not to use any burr twice. I try to use each bur just one time and be done with it,this improves efficiency as well. With this type of technique, speed is not everything because as each clinician is a little bit faster or slower than others or more experienced, but it is critical to try to improve the efficiency and effectiveness of the preparation sequence by not picking up 50 burrs at the same time, we dentists seem to be notorious for picking up a burr time, after time after time. O.K and you can see the three planes of reduction. Now I am going to stop at the canine only because of my bite cushion and I am going to get all the rest of these other teeth finished. Michael, open just a little bit wider, just a little bit wider if you can, real big Michael their we go, sorry about that my man, and we will leave that there for just a moment continuing the prep sequence all the way around, and now we have all the depths placed.
I have been practicing 9 years and I have enjoyed every one,well mainly I've enjoyed every one of those days within those 9 years. We have a very difficult profession that we are in. We have to maintain a standard to keep people excited about their teeth. In years past, in generations past, patients came to you because they needed to, now they come to you because they want to and I love to be a part of that and I would hope that all of you do as well, but It is something that we have to look at doing in the correct way because this new idea of smile enhancement and smile design has come with just some tremendous blessings personally, but, it also rears it's ugly head to some degree too, if you haven't looked at the occlusal harmony the whole masticator process, those elements are key to success in long term. The second thing that you have to look at is you have to look at the aesthetics I am big at looking at proportions, the platinum paradigm, the aspects of gingival and zenith height aspects of deflective verses reflective zones,axial inclinations, length verses width all of these elements have to be brought together and a sound knowledge has to be inherent in both the ceramist and the doctor so you can create this environment where the patient is happy with the end result. This is one of the biggest challenges out there. Now we will use a long taper diamond burr, course to be able to remove the rest of the tissue. This bur will also be used to do incisal reductions as well so we will begin with that. Making for ceramics to be placed. In this case too we are going to be extending a little more incisally on the canine due to the fact that we want to restore canine guidance. We are able to get our 2-millimeter depth on all teeth and ten we immediately go into reduction. Once again, very critical to be able to create the 3 planes of reduction as seen here on the canine, we have the incisal reduction, the mid body, which is more of a straight up and down, and needing a little bit more finessing is the gingival third and the gingival plane because this is very key as to be able to create a nice emergence, as you can see with his canine compared to the rest of the teeth. We will then just extend to the rest of the teeth and involved, trying to create some margins at the same time and then to create a lingual bevel to build the ceramics to. Again, a straight plane, we have our incisal plane and our gingival plane. You may be noticing that I am going right to the contact points, I will be addressing the contacts here in just a moment. One exception to the rules is that whenever we have a diastema like this we are going to be extending slightly sub-gingival about half a millimeter so that so that the emergence of the porcelain is going to be ideal. Dr. Smallwood will continue to prepare the incisal edge and once again reminds us of the importance of the angle of the burr. Again, gingival angle here, to straight body to incisal. We will finish up the gross reduction of the pre-molars.
And now the prep sequence is approximately 80% finished. Using a very small tip Mosquito Diamond Bur medium we're able to just start to break the contacts inter-proximally. This will aid in a couple of things. One, is that we'll be able to create more room for the ceramics to be built by the ceramist and second it will retain the provisionals much better. Now naturally many of the teeth have spaces or between them but wherever we don't have them we're going to just make sure that we define those areas. So using this very small bur we'll just basically reduce that slightly. We obviously have it between eight and nine, we also have it between five and six. Michael go ahead and open, just relax good. Now as a result we have created very small diastamas between all of the teeth. Further defining a slight space which on Michael's left side has very little, define that. Now the last part of our sequence is a long taper fine bur. And this will just go back and redefine the margins a little bit further and remove any of the sharp areas before our final polishing point which we'll show in just a moment. Using this bur we'll also make maintain the three planes of reduction as we talked about. A good rule of thumb as far as preparations if your long axis of the tooth meets at the belly button that tends to tell you that the actual inclination is right where it needs to be as well. All of my margins are right at the gingival height except for eight and nine where we need to drop it about a half millimeter below. So using this burr we'll tend to idealize our margins. As far as the pre-molars we're going to just wrap it around the occlusal surface and not into the occlusal plane. Ninety percent of my preparations on canines are always on the lingual to help capture that canine guidance and disocclude the teeth immediately when building ceramics. Always remember the actual inclination we're trying to bring it more towards the belly button so that everything converges to the belly button. Here you can see the facial reduction all the way down the plane so that all planes of reduction are reduced.
|
 FAGD/MAGD Credit Approval does not imply acceptance by a state or provincial board of dentistry or AGD endorsement 7/31/2018 to 7/31/2021 Provider ID# 317928
 Submitting...