Learn From the Dental Industry's TOP LEADERS!
Sit Chairside withDr. Dennis WellsCreator ofDURAthin® Prepless Veneers- OR -
|
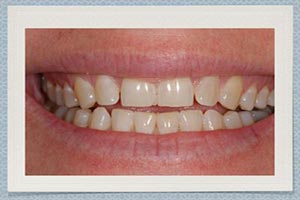
The Art of a Beautiful SmilePart 4 - Removal of the provisionals
Instructors:
Dr. Kirley removes the provisional restorations and prepares for the final seating
What I’m doing to do initially here is we’re going to take the provisional restorations off and I personally like using a 330 bur. This is something that is purely the choice of the clinician. You can use a very thin narrow diamond. We’re going to do this with water. This is interesting here. It’s a good thing to show. But you can see the darkening right around the gum line here. There’s a little bit of microleakage that occurs. And through the course of the last couple of weeks, she’s had a couple of occasions where we’ve had some of the provisional material kind of chip and fracture that we have to repair. And you can kind of see this. Typically we’ll have a patient in provisional but no more than 2.5 to 3 weeks. This has been about 4.5 to 5 weeks in this situation, which is something again that I prefer not to do but because of circumstances we have to extend that period of time. So what I’m going to do is make a gentle score down the facial aspect of the restoration. I’m going to do this with each one. Try not to get into the tooth structure. But if we did, it’s not a problem. I like to also just gently score interproximally just to weaken the bond of the provisional material. As you can see I’m going through each restoration doing this. Going right up over just the incisal edge. I think a very important aspect of preparing teeth properly or removing any restorative material is to have a good foundation of your fingers on the tooth here along with my left hand providing a point of stability. And I even like taking my thumb here and using it as a guide along with my handpiece in this direction. This gives me a little bit of stability. I feel that preparation of teeth without some degree of reference with your finger is recipe for inaccurate result. Once I kind of scored everything here what I’m going to do is to take an instrument and begin to literally kind of break these restorations apart. You’re going hear some noise here, Kathy. Don’t be alarm by that that’s normal if you have any discomfort. So I like to take the crown expander and just kind of go in and gently fracture these restorations, these temporary restorations. Try to remove all that I can initially here. What you see here we’ve removed all of the provisional material. We still have a little bit to go here. But what I want to do is show you some of the things that will happen not all the time but some of the time. And you’ll see this dark area around the neck of the teeth. And this is just some microleakage that occurs. It’s a staining that gets underneath the provisional materia. And what we’ll do prior to etching is to clean this is we will go under and just apply a little bit of Superoxol and see if we can clean that off. And what we’ll see a lot of time that will do a quick easy job of removing but you can still see we have some of the staining there. And when that occurs, it requires sometimes just to mechanically go in and remove that with a bur. But you have to be very cautious not to alter the prep. But you can see how nicely this works. And of course, I have gauze in behind just minimizing the place that this can do. And what you’ll see it will kind of foam up and just etch around there, maybe lightly bleaching the gingival tissues which will just pass here momentarily after we rehydrate. You can still see some minor spots where maybe some of that staining occurs that I can’t remove with that. So I will take my diamond bur and gently go in and remove that bit of staining in those spots that we didn’t have success with Superoxol. Okay. We remove and clean the preparations and now we’re ready for a try in, the restorations. And what I like to do with this is to gently wet them. The assistant will do that. She will actually have to dip them in a little bit of water and bring them over to me. We’ll try these in starting with the central incisors and moving posteriorly with the laterals, cuspids, bicuspids all the way back. And what I’m doing with each of these is I try them in, just kind of verifying the seat. Making sure that lingually everything looks good as well as facially. What we’ll see sometimes is when the temporaries have been on for a little bit is that the gum tissue may have receded back a little bit interproximally where the papilla has not been stimulated. And what subsequently happens here once we get this nice fitting restoration on and the patient is able to floss and stimulate that tissue is that we’ll see that remold and return to its position. We have this in an organizer that gives us the exact little area that put each ones of these restorations in so we know where they are. And the assistant is letting me know each time she passes to me what number it is. Cause I’m not looking. My field of vision is right to where the teeth are. So now I kind of passively place everything on. Looking at position. Open for me. Verifying that we have good adaptation marginally. You know all these areas lingually and facially and good quality ceramist will always come through in these situations. And one of the things that we have done from a smile design perspective is to establish more presence in the buccal corridor areas where her bicuspids are. And the process of doing that required us to adjust or to contour the gingival margins around these bicuspids actually to raise them. And so the depths are from the facial margin actually to the prep on these bicuspids is pretty significant. So we build all that out ceramically an altered the contour architecturally of the gingival margins. This is area typically where we’ll see a little bit of a challenge of help. And whenever I had bleeding here we have a couple of two or three different ways that we can impact hemostasis. The one I’m going to show you here in just a moment is with a laser by Zila which is a handheld portable laser, wireless which is an awesome tool in esthetic and reconstructive dentistry. In this we’re going to use a real low wattage cause all we’re trying to do is just to create a little a hemostasis. And I’ve already initiated the tip here and we’re ready to try this. This is wireless and all I’m doing here is just gently, just touching right at the tissue here where we’re getting a little bit of those bleeders and this just pretty much shots it down which is very clean and often times doesn’t necessitate using a lot of chemistry to stop any little minor bleeding areas that we have or we use it in conjunction with that if we have a real challenge. |
 FAGD/MAGD Credit Approval does not imply acceptance by a state or provincial board of dentistry or AGD endorsement 7/31/2018 to 7/31/2021 Provider ID# 317928
 Submitting...