Learn From the Dental Industry's TOP LEADERS!
Sit Chairside withDr. Dennis WellsCreator ofDURAthin® Prepless Veneers- OR -
|
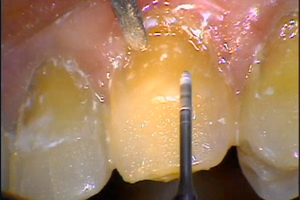
Using Composite Resin in Aesthetic Restorative DentistryPart 6 - Reinforcing the lower incisal edgeThis gentleman has a multitude of problems. Not great problems. His teeth are solid, okay? He's got receded areas with abfractions. He's a grinder. And what we're gonna work on today are the lower anteriors. The centrals and the laterals. What we're gonna do, what we call incisor troughing. It's really incisor reinforcement. What I'm gonna do is I'm gonna built up those incisal edges, so that they're strengthened, and so that he doesn't lose these friable enamel surfaces, the labial and lingual surfaces, because you could see some of them are starting to chip away. But if I reinforce this with incisor troughing with the use of a combination of nanofill, replacing the dentin for strength, and microfill over the top for wear, he's never gonna have to have lower crowns or things of that nature. The problem is, and I discussed this early this morning, there's billions of types of these restorations that people should be doing and they're not doing. And they let their teeth wear away, and it's ridiculous. They not only lose what we call dimension, but they ruin their dentition. And there's nothing worse and more difficult to do, than a lower anterior crown. If a gentle dentist will just take a look at that, and try to reinforce that and educate their patient on what needs to be done, there's so much that can be done with composite like I said earlier, it's unbelievable. And this is one of the really great things that you can do for a patient. It's also, it's a profit center for your practice, and it's overlooked. And it's neglected, and then you end up having to do something that's a lot more destructive to the tooth structure, and it isn't necessary. So, this is why I'm big in minimally invasive dentistry, and this is I think, minimally invasive dentistry at its finest. So that's what we're gonna do today. We already have the patient numbed, and I'm ready to start. The bur I prep it with, I have two burs. It's all part of this kit that I helped design for Brasseler. It's their burs, I just put it together. And the two burs I use are microburs. And I have several microburs in my system. And this is a flame-shaped microbur that we're gonna use to penetrate the tooth surface. Now I use, for this one, for this prep, I use low speed, actually, lowest speed, high torque. It's in an electric handpiece. So I run it in about 20000 RPMs, but I run it under copious amounts of water. Because the whole thing I'm trying to do here, is to protect the integrity of these labial and lingual walls. I don't want them to fracture, because that's what's gonna maintain this stuff in. And when I used to use other systems like a carbide bur system or something like that, I'd get shattering of the bur, and I'd end up breaking them away. Then I used, started to use air abrasion. And with air abrasion, I'd get the sand all over the place. That wasn't controllable either. With this, I've got complete control with this technique. And so that's why I opted to go with this technique as far as preparation. It's a very simple preparation. There is no beveling, there is nothing. It's penetration, [1:01:45] right out of the box at the floor, and then adding the material in. And it's a very easy procedure to do. And it's a great procedure to do for the patient. Now we're gonna do our preps at the same time. I'm using a flame-shaped microbur. So this is the first prep. And all I'm gonna do is broaden out the base and clean out some excess you see in there, on those anterior teeth. You notice how friable the enamel looks. But it really isn't. Those enamel, that enamel is very strong. And when you can put something in it that adheres to it, you're gonna maintain those things like crazy, because it's gonna act just like dentin, sticking to it. So that's the . . . and everybody says, “How deep do you take it?” Well, I'm going in there, at least probably, I would say, it's at least a millimeter, maybe a little bit different. Doesn't make any difference, we're not getting close to the pulp or anything else. We want enough bulk in there, so it blocks out everything, and it gives it support. So that's basically it. And you look at those canines, we're eventually gonna do those because he's got wear in those canines. But I don't wanna do it now, 'cause I'm gonna, it has to do with the relationship to how I develop his canine rise and everything else. So we're working with these lower end anteriors right now. We're not gonna change their length at all. Because we don't want to change centric, we don't want to change its occlusion, all we want to do is get them in nice contact so it can incise well and maintain the length of the teeth that he has. Basically that's it. All I'm doing is finishing the proximal surfaces. I started with a diamond strip. And now we're finishing with a fine, superfine aluminum oxide strip in the inner proximals. And just making it so that there's . . . we'll get everything as smooth as we possibly can, so it's comfortable for the patient. And that's what these things do. It actually polishes the proximal surfaces, and they really, what this is really doing actually, 'cause there's not too much stuff on the proximals. It's really just taking any excesses off. Which could be either bonding adhesive or it could be some material. They're on the proximal surfaces. 'Cause here, we just really restored the incisor edges. Sometimes, material gets into these areas and you have to take it off. I wanna make sure it's not there. Can I have a diamond strip here for a second? Okay, now let me have those . . . that's it. Give me that floss. Just to check it out. |

 FAGD/MAGD Credit Approval does not imply acceptance by a state or provincial board of dentistry or AGD endorsement 7/31/2018 to 7/31/2021 Provider ID# 317928
 Submitting...