Learn From the Dental Industry's TOP LEADERS!
Sit Chairside withDr. Dennis WellsCreator ofDURAthin® Prepless Veneers- OR -
|
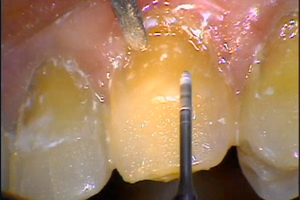
Using Composite Resin in Aesthetic Restorative DentistryPart 2 - PreparationAll right, so if you take a look, you can see the preps in the long bevel. And we've shown you where we want the material to go to. I'm gonna add the material to follow the contour of the tooth surface. You're gonna follow the convexity all the way up. But you're gonna blend the material on the tooth surface, past that long bevel, into this area. And then, if I can get this this way, okay? So you can pass the long bevel, and you blend it in onto the tooth surface, and you're never gonna finish back after that bevel. Let me show you what I mean when we start the finishing process. So let's go ahead and answer that. Now, the neat thing about this, is that we do all three of them. We fill all three of them at the same time, essentially. In other words, I'll do one, and contour and shape and form it, and polymerize it, and then I'll, I'll free up the proximal to make sure there's no material that's, that, that's rough. And I smooth the proximal. Then I go to the next one. The reason I do that is because I wanna, I wanna contour these all at the same time. If I were just to contour and finish one, it would start gingival bleeding, and I'd have more trouble to contour, finish, and polish the rest of them. So I do, I restore them all at the same time, and I finish them all at the same time. This works very nicely, and it makes the procedure much more rapid. So now we have a Mylar strip in place. Why am I not putting Mylar on the other side? Because I don't need to. It's because on the other side is a crown that she has on there. And so, you're not gonna, you can't etch that crown, you can't do anything to it, so . . . give me a little more of that. So I just finely etch it with a brush. It gives me complete control. I can etch anywhere I want on it. And I also apply my bonding adhesives with the brush. So we're gonna etch this old tooth, because primarily, she's gonna have the material, past this bevel, and it's gonna, it's not gonna veneer the whole tooth, but it's gonna blend closer to the incisal edge in this particular tooth, than it does down towards the gingival. So we'll just etch the whole tooth. We leave that on for fifteen seconds. My whole premise of etching is to get it on the enamel first, then place it on the dentin. If you leave it on for fifteen seconds, that means everything's finished for about 20, 25 seconds. Now you can see this is the frosty appearance of the tooth surface. I leave the strip in. Can you put another strip in here? The only reason I don't put another strip in on the other side, is to keep the bonding adhesive off the other tooth. It really won't make much of a difference in this particular instance, but we do it anyway. And . . . let me have a little water. Since I'm in the dentin, I use an acetone base. I use a material called Complete, it's a very nice system. I don't, I don't believe you only need one bonding agent in your whole, in your whole array of material. And I know that you're trying to sell a bunch, but I don't care whose system you use, whether it's the system I use or somebody else's system, you need one that bonds to everything. Okay, let me have the primer. So you need one that has a primer in it, one that has an unfilled resin in it, and one that has a dual care catalyst in it. You get a system like that, and you're gonna have a system that you can bond to any material, whether it's acrylic or porcelain or metal or tooth structure, whatever. So what I do . . . let me have it . . . get it over here. I put on three coats real quick. Air dry it. And put on another coat. And I find this, this is virtually, especially in the anterior portions of the mouth, it gives us virtually zero sensitivity. And this is the way we, we've been doing it actually since all the materials came out, basically, the dentin bonding materials. And I don't believe in everything in one bottle, as you can see. So we're going through the steps, it doesn't take you any time anyway. So polymerize that for me please. So that's . . . the tooth is prepared, you're ready to go. The etch is off. The bonding adhesive is on. And we're ready to apply our material. Which is an A3.5, A3 through A3.5, which is an A3.5 microfill, period. Now . . . can you get the flowable? Uh hmm. |

 FAGD/MAGD Credit Approval does not imply acceptance by a state or provincial board of dentistry or AGD endorsement 7/31/2018 to 7/31/2021 Provider ID# 317928
 Submitting...