Learn From the Dental Industry's TOP LEADERS!
Sit Chairside withDr. Dennis WellsCreator ofDURAthin® Prepless Veneers- OR -
|
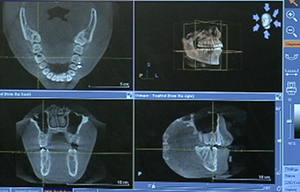
Common Sense approach to Molar Root CanalsPart 2 - Flaring canal and scouting the coronal two-thirds
Instructors:
Dr. Marvin Berlin demonstrates how to flare the canal and scouting the coronal two-thirds and apical one-third.
First thing I do use is our SX taper. And again what I'm going to do here is I'm going to likely go into the orifice. We know our estimated length is 21. That crown height looks to be about 5 which gives me about 16 mm of root length. I'm going to leave about 5 at the bottom. So I'm going to take this maybe 10-11 mm just opening things up. Some Glyde in that point. Anytime we use anything rotary in that canal, we start of and my assistant fills it with some Glyde. So basically anytime rotary goes in there, I need to look at a puddle of our collating agent which we uses Glyde. I'm going to follow that with our ultrasonic. Victoria is going to put in our hot bleach while I'm using ultrasonic. I'm just kind of following into the chamber. I know it's kind of hot. Just bare with it. One of the things we have to understand about root canal is that we are here to kill bacteria. That's the whole game of this. The whole name of this game is to get rid of pulpal tissue, infected pulpal tissue in the most accurate and active way possible. I did that by heating up our sodium hypochlorite. Cliff Ruddle, Dr. Ruddle showed us back in I believe in the 2000 that heating up the bleach was like 40x stronger at killing bacteria than leaving it cold. And it was a combination of heating it up and then activating it with an ultrasonic tip that just, to me the analogy is like we put let's say you got a t-shirt with some dirt on it and you set it in some cold water and just let it sit. It might get a little clean but if you set it in warm water it might get cleaner. If you set it in warm water with soap and you agitate it back and forth that's a washing machine. And that's what we're doing inside that tooth. We're putting hot bleach, we're agitating it and we're killing bacteria. When I started heating up my bleach, I solved more and more and more lateral canals and success rate went up dramatically after doing that. Now you have to be very careful. Obviously hot bleach is hot bleach. And so rubber dam is an absolute must just like we talk about. And you need to be careful with it. Just drop into the tooth and anytime it's going into the tooth I go see my assistant has her suction right next to the tooth. So you leave absolutely no chance for error with that but we want to use the effects of it. So far I've only gone about maybe 4 to 5 mm into this canal and just getting the debris out of the top. Haven't put hand file in yet. I just kind of get the debris out so we can start our process. We're going to work on the coronal 2/3 of this root first without even touching the apical 1/3. We're going to leave that alone for a while. We're just trying to get access to it. So it's just kind of in a clean up phase right. I'll go back with SX shaper. And I'm just going to let this fall into the canal. I'm not ever forcing anything never ever force anything in the canal. There we go. Beautiful. Let's get that sodium hypochlorite one more time. Again I typically always follow that with the rotary with the sodium hypochlorite. What this does it activate that sodium hypochlorite. So you got hot bleach mixed with collating agent mixed with ultrasonic. We're really killing a lot of bugs right here. Getting rid of any nerves that you, right into the orifice. Perfect. Just dry that out for me. Take a look at that. It's looking good. What we're going to do right is we're going to take a high speed. I'm going to flare that canal out. I'm going to create some straight line access, more of a funnel shape. What we want to do is create an opening door. All I got to do is get in the area of the mesiobuccal area, the mesiolingual and area of the distal. We're just going to fall into that canal. See just looking at the mirror and that's what I want right there. So all that do is get even close to that and I know my file is going to fall right in that opening. So we're looking good there. We just want to make each step that that we do, we want to make the next step easier. Okay. Now then we'll take our first file in there. And I'm just going to take an 8. We estimated our length to 21. I'm going to put it at about 20 and just kind of see where it takes me. Right now, I'm just kind of scouting. Actually, I'm going to leave the apical 1/3 alone for just a bit. We said 21 we're going to leave 4-5 at the end. So we'll go to 16 and just making sure we can, I have no blockage. Everything should be nice and smooth to 16. That's what we're doing. That means our coronal 2/3 of that canal is almost done just from what we just did. If we got rid of the coronal 2/3 that just leaves us with apical 1/3. And really we're doing a 5-mm root canal. Okay. You're taking a 10. Again, we're going to about 16. The beauty of 16 which I love is I don't need to have a stopper on it cause we know our file length. We put our file right there. Those little flute stops at 16 universally and all. So anytime we're around 16 I don't even have to put a stopper on it. I just kind of feel it which make this go more efficient. It's always good. Let's take a 15. And again, I'm just kind of following this canal, getting a little resistance, not much. Just a little bit. What I'm doing is I'm taking this about 2/3 into the root is my goal here, leaving that bottom area when we fine-tune this. This feels pretty good. I'm going to take my first rotary file. We're going to use Pro Tapers. I like Pro Tapers a lot. They're very consistent for me. We'll start with the purple one which is the ISO 10. And again I'm going to leave it at 16. Again distal right there is the first one we're going to use. And anytime we put rotaries in there, you'll see Victoria is filing that with Glyde. You always want to have this introduce in the canal. This is WD-40 guys. Okay. There were go. The book says on this 300 rmp and torque around 2.0 Newton-cm so we'll put it [0:17:25][inaudible] so we'll kind of follow this into the canal. Again I'm going to about 16. We haven't determined our official working length yet. I am just getting it to the point where I feel confident to get our working length. That went pretty. I'm getting a little resistance at 16. Again we're thinking its going to be around 21. We'll see here in a second. That feels pretty good. I definitely got two canals on the distal so we got four canals to work with. But we knew that from our CT scan. So let's irrigate that with some water. And we're going to get our length. I like to get all of the sodium hypochlorite, Glyde, everything out of here before we take our length. And even though the apex rotator will let it be moist I like to get it as dry as possible. So again we think our length is going to be somewhere around 21 so we'll put it at around 20. And we'll dial it in. Victoria, let's start on their mesiobuccal. Thank you, ma'am. And again he picks a locator. You can't live without it. Earlier you know we always took estimated working length and that gave us kind of a ballpark length to that tooth in each room and how we're going to access each of those roots. You know we took care of the coronal 2/3 right off the bat based on that estimated working length. But then it gets down to business and we've got to find the apical 1/3 and more importantly we got to find that apex and I do that with an apex locator. I can't imagine doing dentistry without it. In fact, you can't do root canal with an apex locator in my office. That's the one thing that is absolutely critical because I need to know without a shadow of a doubt exactly where that terminate is at the tip of the root and we used with the J. Morita Apex Locator. I know there are some offices that will put a file in there and take an x-ray, you know, the old school ways and try to verify it. But to me that's exactly the wrong way to do it. I mean you're going from the most accurate way of measuring canal with J. Morita Apex Locator to the most inaccurate way of doing it with a x-ray. That's like me if I'm building a house and I know that I got a [stud] that needs to be 10 feet, 3.5 inches and I walked it out with my feet which is that would be the similar thing using an x-ray to do that. No, I want to take the tape measure out, I want to measure to exactly the right length and that's why I use apex locator. You kind of hear that beep. Beautiful. That's got me right there and let me pull that stuff just a bit. You push it right down. I'm going to re-measure that. I think I'm going to move it just a hair. Nope. That's perfect. Okay. Mesiobuccal. Let's see how close we were. The text says 21. Right on the money. |

 FAGD/MAGD Credit Approval does not imply acceptance by a state or provincial board of dentistry or AGD endorsement 7/31/2018 to 7/31/2021 Provider ID# 317928
 Submitting...