Learn From the Dental Industry's TOP LEADERS!

Sit Chairside with
Dr. Dennis Wells
Creator of
DURAthin® Prepless Veneers
- OR -
Larry Rosenthal
Sonia Leziy
Michael Koczarski
Henry Gremillion
JUST TO NAME A FEW!
Register for a PREMIUM membership and learn from the best in the industry!
|
Using Composite Resin in Aesthetic Restorative Dentistry
Part 4 - Finish, polish, contour
Instructors:
Buddy Mopper, DDS
Buddy Mopper, DDS
Dr. Bud Mopper is an internationally renowned lecturer in esthetic dentistry with an emphasis on composite bonding using direct application techniques. Dr. Mopper is in private practice in Glenview, Illinois, where he has been doing minimally invasive dentistry with composite for 40 years.
Dr. Mopper reviews his finishing technique
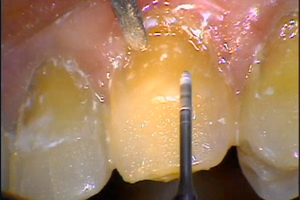
Finishing and polishing and contouring and restoration, is exactly what it is. It's not one word, just polishing and restoration. Unfortunately, a lot of dentists feel that polishing and restoration is just being able to use one type of system to get the things done. We don't believe that. I don't believe that. I know that in order to get the best finish and polish, the best margination, you have to understand where carbide burs will help you or finishing diamonds if you wish. Which I don't use basically. I only use one finishing diamond underneath the free margin, that's the 8392-016, that's the mosquito shaped bur, which I'll show you. But basically, I use carbide burs. I use discs. And I use rubber-impregnated systems, with either diamond or aluminum oxide. When we're finishing microfill, everything is polished with an aluminum oxide material. When we're finishing a NANO or a microhybrid, then we're using diamond-impregnated instruments, as far as our rubber is concerned, our rubber-impregnated instruments. We still rely a lot on the discing system. It's a system that we like - it's a FlexiDisc - because of its resilience, and you'll see how easily it contours and shapes these teeth. And in conjunction with these, the ET system from Brasselers. So that's how we're gonna finish these. We're gonna finish them, in a, in sort of a, I use them, the different polishers, the way I need to. In other words, when I, I know when I'm gonna finish the margin, the occlusive margin of this restoration in the tooth surface, I can't do it with anything but a disc. That's the final finish. It's gotta start with coarse, going to medium, fine, superfine. You'll never get it done with a rubber-impregnated system the way you want it. You wanna make these restorations invisible. You wanna make them disappear in the tooth surface. And the only way to do it is with really great finishing and polishing. So that's what we're gonna do, step by step sequence, that's what you're about to see. All right, we're just gonna start polishing. I don't need the water. I don't even need water with a carbide bur. The only thing I need water with basically, is if I use rubber instrumentation. When I start carbide burs I don't need it. Sometimes we'll use it. But I, what I'm doing here, is [38:33] troughing the convexity of the tooth surface. So you notice, I rotate the bur in my hand, fining the convexity of this tooth surface. Whitening out any margin that I have. And as I come towards the gingival, you can also cut on the gingival tip of this bur, okay? And so that's the way we keep, maintain the contours of these teeth. And I'll just generally do it over all of them. And you can use, this is an electric handpiece. I got it running at about 30000 RPMs. But I'll just give an example. If you don't have an electric handpiece, people tend to rub the handpiece up like this and polish. That's not the way you do it, okay? If you wanna polish with and gain control, then barely touch your foot control, and your bur will run gently. And you have control. See how nicely that wipes it up. But if you rev it up, you're gonna lose the contours. You're gonna flatten it up. And that's where people make a mistake. So I wanna go down here in the gingival with an air rotor, for instance. I'll run it very slowly. And I'll tip the bur along the contour, along the edge of that tooth. And run it very gently, underneath the gingival sulcus. And here, I've got water doing that. And that sort of makes it very helpful for the, at the gingival area too. So you can use an air rotor. I'm just doing this to show you, you can use both. You can use an air rotor, and my partner doesn't even like the electric handpiece. Our dentist doesn't hardly use the electric handpiece, does he Gracie?
Sometimes he does. Sometimes, but not very much. Yeah. And he likes an air rotor better. But you have to learn how to control it. Right. Control is key. That's actually sort of the neat thing. I'm blending this up here. If people ask me, “What do I do about white line?” Well we don't get white line. Another thing that I use, okay, to go underneath free margin, is I'll take my electric handpiece, and I back it down to 7500 RPMs, and I can use it with water or without water. And I, what I do, and this is really great, is I retract back there. Or Gracie will retract back the gingiva. And this is where, because it's very difficult to cut the material down beneath free margin with a, you can get a good margin, okay. So I'm gonna take this and run it very slowly. And I'm gonna hone that margin down right on the tooth surface. And you can get a bur, this bur [41:59] has a safety, but I don't even use its [42:01] safety. Now I'm getting a little bleeding back there. But I'm holding the gingival tissue back here. You can see how I tip of the bur. And that gets rid of that margin. Now I'm an all-carbide person when it comes to composite, basically. But under here, if you're familiar with carbide burs at all, they have a tendency to shatter and break that off, whereas this cuts finely, okay? And you get a perfect margin. That's why you get direct [42:46] application of material to the tooth surface. That's why we think and I know, we get better margination than you'll ever get with a porcelain enamel. And now, I'm gonna take, and here's where the disc come in, I'm gonna take a coarse disc, and the uniqueness of this coarse disc is its resilience and its flex. The coarse disc and the FlexiDisc system, is a [43:12] 6 mil back, and our grit is finer than most coarse grits, so that you don't have trouble getting scratches out when you go from coarse to medium to fine to superfine. And by using pressure in the right way . . . I don't want it in here, I want it in this handpiece . . . and here, I switched to air in this particular instance. You can use either electric handpiece or air, lots of guys . . . I use both. In this particular instance, I'm gonna use an air-driven handpiece. Now one of the reasons I don't use an electric handpiece at all times, 'cause it's very heavy. And it hurts your hands after a while. So I think that's why I go between the two. I could use either, but this is much easier to use. I just turned the speed again. The speed, you control the speed. We want the speed down at the lowest level, okay? It gives us more control. Now what I'm gonna do here, is gonna marginate the material. This coarse disc is what's gonna blend this material into the tooth surface. And it's gonna help shape the tooth also. Again, I tip the handpiece in order to marginate the material when I need to. You can see I gotta tip this way, because the canine, it's like two sides of [45:10] the teeth piece. So if I'm going on this side of it, I gotta go this way. I'll come on this side of the tooth, 'cause the problem is it's in the center, like this so it's like this. And when you go to shape it into the, file the contour and the convex their teeth it's in here. Now, there's a little area of white line in here. You say, “Well, how about white line?” Well, I don't get white line. 'Cause you use the proper disc in order to get it off. So in this particular instance, I'm gonna go in here with a coarse 3/8 sized disc to get this excess off here. And that allows us to get access into here, and get into this area. Now you can see the white line is gone. And you can see I can take the disc right down to the free margin without damaging anything. But you see I'm doing it very slowly. I call it undercontrol. Now what most people do, is they try to dance around the disc. I make the disc, you'll see how when I use the medium, I let the disc sit on the tooth and do the work for me. You see? I use a little, sometimes when I get bleeding and it's in my way, I will take Superoxol on a brush, then put it on for maybe three to five seconds. Just like this. A little more. Wash it off. And then that will control bleeding. Can I see that comes out of there though? This small disc is unbelievable, because you see, that's why we don't end up with white line. Because we have, our answer, if you noticed, all my instrumentation is for excess. Most people don't have that instrumentation. Well they need it, okay? It's a small investment for perfection, is what I call it. And that really is. 'Cause they need that type of instrumentation in order to get the right thing. The beauty of this coarse disc, is when you use it, it's not, we have no scratches. You see there's excess material up here, that's what we're getting off. Then we use a material called Enamelize. It's really a great aluminum oxide paste, because we put just a little dab . . . can I have a piece of dry gauze please? On each tooth. Gracie will put just a little polishing paste on each tooth. And then we have a felt disc. It has a Mylar back, but it's got a felt. It's like shining shoes. And we just go ahead and take this and run it on the tooth surface like so. And we are finished. And they are invisible, that's the beauty. And you can't find the margins or anything else. And that . . . the prep, everything is important. The prep, the application, the contouring, the sculpting, the finishing, and contouring. Everything goes in a, and it makes it go so much faster if you do it in sequence like that and pay attention to the details. So that's what we're all about here.
|

 FAGD/MAGD Credit Approval does not imply acceptance by a state or provincial board of dentistry or AGD endorsement 7/31/2018 to 7/31/2021 Provider ID# 317928
 Submitting...