Learn From the Dental Industry's TOP LEADERS!
Sit Chairside withDr. Dennis WellsCreator ofDURAthin® Prepless Veneers- OR -
|
Common Sense approach to Molar Root CanalsPart 1 - Estimating working length
Instructors:
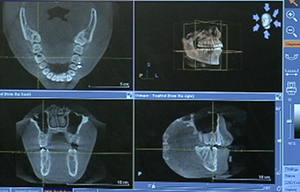
Dr. Marvin Berlin demonstrates how to estimate the working length for the root canal and why it makes the procedure much easier.
Unfortunately when dentist hear that, a lot of dentist hear that, they cringed. And they with molar end specifically a lot of dentist will just say we'll refer those out. I don't want any part of them. And I want to break that down today and say I think most dentist if they have the ability to prep a tooth, they have the ability to do root canal. In our practice root canal, buildup and crown is one word. It's one procedure. We typically do them all in the same time. We don't do a root canal and have them back for the buildup for the crown and have them back to seat the crown. We typically like to do this in one appointment. The last thing I want is a patient in my office whose come to me with a toothache, I don't want to give them a handful pills and a business card to go to another doctor, an endodontist, to do the root canal when I know I can do it. And patients don't want that either. If you ever referred someone to a specialist and they kind of slump their shoulder and say doc you can't do that. That's not going to happen. That's not going to happen in our practice. And so we want a better understanding of root canals. We want to break it down real simple and make it to where we take it one step at a time. And each step builds on the next step. And we'll make it an enjoyable procedure for the patient and for the doctor. Good morning. This is GW. Thanks GW for being here today. We'll get this tooth fix for you. We're working on tooth #30, lower right first molar. We see we got distal decay. It's in the nerve and hurting pretty bad. We've already numbed him up so first thing we're going to do is take a look at his x-ray and CT scan. So let's take a look at that. We want to get an estimated working length index so we're going to go open and we're going to measure. And I usually start right at the apex and we're going to work our way following this path. And we're going right about to there. And I'm going to produce our occlusion first so we'll take it to about there. This is just an estimated working length 20.8, so we'll say 21 on our estimated working length on this tooth. Just on safe side, we'll check another root just to see if it's similar uses. They're pretty close. Let's see if we post 21. Again we're just going to work our way up that canal and then I'll take it to about that occlusion. So 20.9 so yeah 21 is our working length. We're also going to check over on our 3D scan which we took prior to this. We are at tooth #30. We're going to zoom in and see if we've got three or four canals. We'll make this a little bigger. We'll move this out of the way. We'll look at our tooth right here and see there's an orifice. We definitely got one here, one here, mesiobuccal. This looks pretty wide. It's still one. It's still one. It looks like it goes into 2. We'll definitely look for 2 on the distal. Yeah that' pretty, looking like we got two canals. Okay. Let's get started. You know I didn't use to do this but taking the estimated working length has saved me hours and hours and hours of chair time and made my root canals way more predictable. Whether you're doing it on a traditional x-ray or a digital x-ray like we just did knowing your estimated working length is critical. Now we typically work on the coronal 2/3 of that root leaving the apical 1/3. And so from that estimated working length I can readily get rid of the pulp chamber and the apical, I mean the coronal 2/3 of that pulpal tissue and then focus and really dial in the apical 1/3 to that. So that's what we just did. And I know this is going to be a success rate just from looking at that x-ray. When we start here the first thing I'm going to do is I'm going to get a mouth prop. You can bite right down on that and kind of rest on that. When we start it's all about access and visibility, and everything that we do with endo and the root canal is not finished until we buildup and crown on it. So I'm going to go ahead and start our crown prep. I'm going to care of this mesial aspect and get rid of that and we're going to adjust the occlusion down. A shorter tooth is easier to work than a longer tooth. So we're going to reduce our occlusion. So we're going to reduce our occlusion. So we're going to start with that. We're going to get rid of some decay then we'll put a rubber damn on. Before we start a root canal, again we're going to look at this and we're going to consider the root canal, buildup and crown as one procedure. Okay. Even though we're talking root canals, I know that I'm going to end with a crown prep at the end of this. The beauty of that is it's a lot easier to do a root canal after the tooth has already been prepped for a crown. So we're going to reduce the occlusion down 2 millimeters. I'm going to go ahead and prep mesial and distally and get those walls out of the way. I'm going to leave the buccal and lingual walls because we have to have something for our rubber dam to hold on to. But we're taking the tooth and we're just kind of shaping it down to the point where it's going to be a lot easier access for our endo than if we just make a very small access opening right on top. GW if at any time you need a break just raise your hand for me. If something doesn't feel right, raise your hand. Otherwise enjoy the ride and enjoy the music. All right. We got our occlusion taken care of. I kind of round these corners off just to make it easier for the rubber dam to then catch on this. Very good. I clean it up with this bur right here. This kind of gives me a good flat surface. Again, I'm just kind of creating an area now where I can measure my stop from my files. Perfect. Okay. Let's get a rubber dam on there. Rubber dams. Interesting concept and honestly the medico-legally rubber dams are the standard of care in root canal. If you are not using one and anything bad happens. You drop a file. You cut something. You do anything that's considered negligent, you are guilty if you are not using rubber dam. If you are using rubber dam, you're completely cover. My practice insurance says there's a line in that says if something happens endodontically and I'm not using rubber dam, I'm not even cover. So it's that important. You have to find a way to use it. And it's so much better for the patient and it's so much better for you. So there shouldn't be a question about it. So that's why we're using them. When we put a rubber dam in clamp on there's multiple ways to do it. I see some offices and some docs where they actually put the rubber dam on the clamp and then try to slide it over the tooth and then mesh it around. Of course its way more difficult than it needs to be. Put that clamp on. Make sure you got a secure clamp on the tooth and then slide your rubber damn over the clamp and it just seems to work so much easier that way. I typically put these on myself. I know a lot of doctors have their staff put it on. But since we're putting it on after I prep the tooth it just goes in sequence for us to do it and it just flows a lot easier that way. We're going to use a 12A clamp. Here we go. Looking good. Okay. Let's put a little wrinkle around the suit. Let me get this where I wanted. Okay. At this point, what we've done is we reduce the mesial and the distal contact one that allow the rubber dam to kind of slide in place without having to using floss and it will reduce the occlusion so we're about 2 mm short which is going to make this to our measurement that we saw which was around 21 mm. So now we're going to get rid of the decay. Let's that taken care of and we'll probably find our way into the pulp chamber. All right let me see some teeth. And use a little caries detector and see where there's any decay left. Get that clean it up first. It's not too bad. What we're doing here is we'll enter pulpal anesthesia mainly to get the bleeding under control. Just in case there's any active nerve tissue there. Sometimes you want to make sure it's comfortable for him. Here we go. Looking good. |

 FAGD/MAGD Credit Approval does not imply acceptance by a state or provincial board of dentistry or AGD endorsement 7/31/2018 to 7/31/2021 Provider ID# 317928
 Submitting...