So now, let me have Mylar strip. I did not use Mylar strips because you can't wrap a tooth, and you can't contour a tooth, with a Mylar strip, it's impossible. That's why I don''t use them. And they get in my way. And so . . . but I do use them to etch and protect to put in my bonding agent. Once that's out, I use the sculpting instruments, which are so finely made, that I can contour the tooth any way I want to, and that's why I'm a sculptor. Let me have the etching. Thanks Grace.
Uh hmm. We'll apply the etchings. These brushes are the cosmetic brushes. The reason I use brushes is 'cause I can get the etchant down beneath the free margin without irritating it. And so we can get it down beneath, we make sure we etch beneath the free margin as well, because we wanna make sure that we bond all surfaces. Now this is the canine, and you can see she's lost a cuspid tip. If we restore that cuspid tip, I can in composite, I can restore a canine rise beautifully. And that's probably what we'll do next on Marcia, so that she'll have less chance of getting abfracted areas and . . . 'cause she's a grinder. I think she grinds during the day as well as night. Okay. Oh let's wash this. Let me have just a dry brush. Or a fuzzy. One of the two. I'll just take the excess water out. Bonding agent. I'm just taking this fuzzy and taking out the excess water, that's all I did. That's what I did, okay. So now, we take the bonding agent, then we apply it, and then we flute it. Three coats, that's all you need. Rethin it. And one more coat, I wanna make sure this doesn't move with it. You wanna see no movement in that bonding adhesive. Once you've got that, put on one more coat, which I only do for good graces, just to make sure I get perfect seal. You can take the strips out Grace. And then I'll rethin it. Polymerize it. Now we're gonna apply the flowable. Grace is already starting to express it. So it's easy for me to express once it's started. You can see how gently I'm flowing that in. I take it right down to the margin, and it stays right where we put it. That's the beauty of this. That flowable microfill is terrific. I think we're the only ones on the market to have a flowable microfill. But what it does, it makes it so easy to apply this material, the paste material to it. It's unbelievable. And I can use the tip to manipulate it. Polymerize that. Now once I've done that, then I can add the material over the top, easily. Now we're ready to add our ellipse material. We've got this light reducer, because the light from these cameras, absolutely polymerizes this material, so we have to work fast. How are we doing Marsh, doing good? Okay, huh?
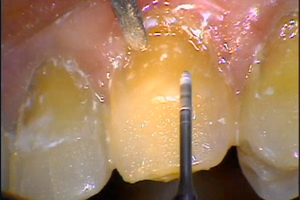
Okay, huh? Now, the best way to view this restoration is to make sure you've got it smooth, there's only incisal view, okay? You can see how the contours are perfect. Just following the tooth surface, okay. That's why I use this view. Before sealing the margin, a quick lecture. Now I'm just gonna do a seal margin again. I just have a little [30:09] ellipse material. I roll it in my fingertips. Bring the material to the gingival aspect of the tooth. And milk that baby right underneath the free margin using this instrument. You can see the way this blade goes right underneath the free margin, without damaging tissue and causing bleeding. How does it look to you Grace? I think I need a little bit more over on this, this looks . . . medial proximal I think, right here. A little bit on this. A little bit here, just a tad? Uh hmm. I use Grace a lot to tell me what's going on, on the tooth, 'cause she's got another pair of eyes and she's very tuned into this, and she knows what's going on. And that's another key to doing this kind of dentistry, is to let your assistant work with you and be a part of the whole thing. A well-trained assistant and one who knows what they're doing is worth their weight in gold. Let me have it over here. Just a little bit. We're just gonna add a little bit to the medial. Right in this area right here, just to show this area out. And that's the beauty of this material, because you have complete control. Plus you can see the control you have with a microfill. There's nothing that handles like a microfill. No material on the market handles like a microfill. No material on the market polishes and finishes like a microfill. And the microfill I'm using here, I'm proud to say, is Renamel Microfill, it's one that I developed. And with the use of the best chemists in the world, I think. The best chemists in the world, we have our partners in Germany who I work with. I design the materials, and I tell them what I need, and they make them. Polymerize it. Okay. And then we have just a, a Mylar strip. Or a diamond strip. I'm gonna finish that. 550? 550. 550. Mylar? No, diamond first. Just to distal this. Now we hold the strip very firmly against the tooth. So that we don't go on it . . . that's the beauty of the narrow strip, 'cause you don't violate that gingival intergrity, and you get no bleeding. Then we hit it with aluminum oxide on both sides. And we're ready to start the next one. A lot of people surrender this stuff behind. I don't. I have a tendency to want to put it on and [33:18] educate a little bit. And this is just my preference for putting on gel. I think I can get it underneath the free margin better with the use of a brush. All ready to add our little flowable again. Okay, light on there. It's a neat procedure. It really is. It's so simple. And yet, these things don't, you know, they very seldom come out. Once in a while, a hygienist will crank on one, or you know, or something like that, but I've had it for years. Especially if you take good care of the incisor guides and get them out of group function, then you're not gonna have this problem. And then if a person is an excessive night grinder, then you have to wear a night guard, that's the only way you can stop this, okay. But these abfractions, there are literally billions and billions of abfractions running around and dentists are not restoring them. And they should be restoring every one of them, okay? And if they knew how to, and not, they shouldn't be restoring them with a glass ionomer, reinforced glass ionomers. They're ugly, they stain. They shouldn't be restoring them with hybrid, they come out. They stain. They are not polishable. The only restoration that really is great, I'm telling you right now, is microfill. I don't care what anybody tells me, you can talk about all the nanofills, they don't work down there either, okay? And I make the nanofill, and I know. And I know where nanofills belong. It's the one thing I know, is where the materials belong. I know where microhybrid belongs. I know where nanofills belong. And I know where microfills belong. Let me have . . . and it's just easy manipulation, it's not a big deal. And if a person wants to put undercuts in, they can put undercuts in. If they're not, you know, they're not sure about the whole thing, about the fact that you're gonna get enough adhesion with this type, they can put undercuts in. They can do that too. And I've had the occasional patient that won't wear an appliance or something like that. And once in a while they'll [35:49] pop, wants to put an undercut in to hold it.


 FAGD/MAGD Credit Approval does not imply acceptance by a state or provincial board of dentistry or AGD endorsement 7/31/2018 to 7/31/2021 Provider ID# 317928
 Submitting...