Learn From the Dental Industry's TOP LEADERS!
Sit Chairside withDr. Dennis WellsCreator ofDURAthin® Prepless Veneers- OR -
|
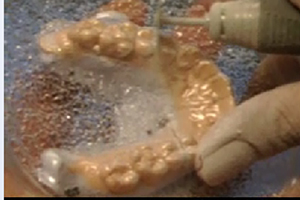
Anterior Bite Plane AppliancePart 4 - Adjusting the occlussion
Instructors:
Dr. Brady demonstrates how to adjust the anterior bite plane appliance.
So now that we've got our bite plane made I want to just show you what we got after we cured this. Let's talk about curing this just for a minute. Now since I used composite, I actually just cure it with my handheld LED curing light. You can actually cure this in a light box like a triad oven or a procure oven. If you're going to put this in an oven that uses halogen bulbs because of the heat you actually have to put this back on the model the actual Biocryl form because it response to temperature would melt and it wouldn't fit in the patient's mouth if you did it in an oven without having it on the model. Triad for sure you want to cure this in an oven cause they don't cure thoroughly when you're using a handheld LED light. Again one of the advantages to composite is I was able to just do this with my regular curing light that I used for my composite when I do restorative dentistry. There is an air inhibited layer on this cause I coated it with dentin adhesive. So one of the first thing I'm going to do before we try it in Katie's mouth is I'm just going to remove the air inhibited layer. This is just a rubbing alcohol soaked 2x2 and it's perfect for getting off that resin. I do this also when I make provisional to get that air inhibited layer, that guppy layer off before I start to trim my provisional. The next thing we're going to do is we're simply going to try this in Katie's mouth and see how it fits. And it should just slide over her teeth without having to be forced into place. I can ask Katie it shouldn't feel super tight or like its pinching any of the teeth. No. Okay. If it was too tight what would we do to correct it? Well the first thing that we would do is we would actually go back and we would start 0.5 mm at a time shortening this labial edge of the Biocryl. So you really want to start with that edge a little bit longer and then you can shorten it as needed to get back to the right retention. If you make it too short to being with and the Biocryl is too loose there really isn't a great way to tighten them. You can reline them with flowable composite but it is difficult to do. So I always leave the labial flange Biocryl long and then I can trim back in the mouth as I need to. Once I get it so that it will go in and seat with just finger pressure. If then Katie had told me that it felt like it was putting undo pressure on any one tooth we would just take one of our green mixing bowls from the lab. We would fill it with water and microwave it to get close to boiling. Drop the entire appliance in for 10 seconds and no more and then take it and put it back in Katie's mouth and actually let it cool and shrink a bit against her teeth which will be more accurate than the model. And I actually give those patients those directions in case they need to refit it at home as well. In our case now this one actually fits very nicely. It's just the right amount of snugness for Katie so we don't have to adjust it. So the next thing we're going to do is just finalize our occlusion. So I'm going simply have Katie bite together. And I'm going to take a look. And what's happening for Katie now is she's pretty much just occluding on this one canine on her lower on her left hand side. It's a little taller so we're going to start adjusting it. I actually like to use either blue or green marking ribbon to do the centric stamps and what's my goal. My goal is to get as many teeth as possible across the front touching so we can distribute the load. So I'm just going to have Katie together and tap, tap, tap and open. And tap, tap, tap and open. And now I'm going to actually take this out of Katie's mouth and I'm going to do all of the adjusting outside of her mouth. So I got my appliance therapy, my appliance adjustment kit from Brasseler that we have in the laboratory here and now I'm just going to use an e-cutter or an acrylic bur and begin to adjust this. Katie, we should have sunglasses on you cause of the dust. You do want to just get rid some of that composite dust before you keep putting it back in the patient's mouth. All right Katie tap, tap, tap and open, and tap, tap, tap and open. And now we got a canine on either side. But I'm actually going to see if I can get some of Katie's incisors at least her centrals engage in this. So the more teeth we have contacting versus leaving just two the more we're going to just distribute the load. It's very common for patient if they have just one or two teeth contact. They come back in and complain that those teeth feel sore. So we want to distribute the force they can apply amongst a larger number of teeth. Go ahead and tap for me and open and tap and open and bite together for me, Katie. I'm just getting a sense of where we're at. We're pretty close to picking up this one lateral incisor. Go ahead and open and actually we do have a mark for that lateral incisor. So now we're at three teeth. What I want is definitely to make sure that we have an even number of teeth on either side of the midline. I don't want to give Katie's muscle any reason to fire in a dis-coordinated way. I'm making sure I hold my bur, my hand piece so that I'm staying flat in an AP direction just like with the anterior programmer that we made when we did Katie's exam in the video on joint diagnosis. I don't want to create an incline. I want this to be flat in an AP direction. So as I make adjustment I need to make sure I'm controlling that with my hand piece. Tap, tap, tap and tap, tap, tap and open. And bite together for me, Katie. All right. And we're very close now to even getting the other lateral. And open. And actually close enough that we have a mark. And tap for me Miss Katie and tap and open and bite together. Okay and open. So I'm just going to keep going here until I get all of these tooth contacts. One of the things you'll probably notice is that I'm just allowing Katie to tap. That I'm not using my leaf gauge to do this adjustment. I'm also not guiding her mandible. Why? Because I got a nice big flat platform in an AP direction so that when she goes home and this device effectively relaxes her muscles her condyle can seat. She won't fall off the platform. So the appliance itself will take care of that and I don't need to fuss with that as part of the adjustment. It's one of the reason this can be such an efficient appliance to make adjustments to. So I like this particular caliper cause it has the flat side so I can really be making sure I'm staying flat in an AP direction. Katie is enjoying getting all the composite dust on her. Tap, tap, tap and tap, tap, tap and bite together for me. Okay. All right. So as we've been adjusting Miss Katie's appliance now we've got all six of her front teeth touching. So we got two canines, two laterals and two centrals. And Katie I'm just going to slip this out here and I'm just going to make sure that everybody can see those marks. So we just continue to adjust it down until we had all of those tooth contact. The next thing for us to do is to check her guidance, to make sure that everything is nice and smooth. So I'm going to actually switch whenever I do my excursive I actually now use red. So I'm going to put this in here and have Katie bite together. And Katie go all the way to the left for me and back and all the way to the right and back and forward and back and open. And I'm going to switch side. Katie do the same thing, all the way to the left and right and forward and back. And one of the things I notice is she's bumping over the edge of the composite in protrusive. I'm going to have her tap again for me. Tap, tap, tap, and tap, tap, tap. Cause I don't to eliminate any of her centric contacts as I'm creating the guidance. Now as it happens for Katie she's already got beautiful nice group function on all of her anterior teeth and that classically is what you'll see on this appliance once you get all the stops in. There's not much to do on the excursions. So what I am going to do is I'm just going to bevel all the edges so that she can go out pass the composite on that in protrusive and not get trapped or bumped back as she was doing even with the ribbons in there. So I'm just going to use my acrylic bur, my e-cutter. And now I'm just going to be holding it an angle. And I'm just going to literally be creating a trailing edge on the labial of this upper composite as we would expect to see even in Katie's mouth on the labial of her incisors. All right. So Katie bite together for me and now come forward, and back and go right and back and left and back and open. All right. She's got one place where she's still bumping on this one central. Bite together and go forward and pull back and open. So I simply just mark that so I can see where she's going over the edge of the composite so that I can smooth that. And bite together and now go forward and back. Much smoother. If you can watch there's no bumps now. And go right as far as you can and back and left and back. So now she's not getting trap anywhere. Her anterior teeth are not getting caught on the edge of the acrylic. Go ahead and open for me Katie. |
 FAGD/MAGD Credit Approval does not imply acceptance by a state or provincial board of dentistry or AGD endorsement 7/31/2018 to 7/31/2021 Provider ID# 317928
 Submitting...