Learn From the Dental Industry's TOP LEADERS!
Sit Chairside withDr. Dennis WellsCreator ofDURAthin® Prepless Veneers- OR -
|
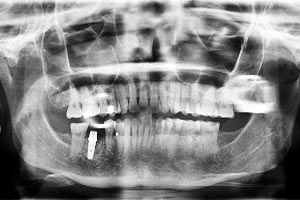
Implantology Breakthroughs for the GP Part IIPart 1 - Site #30 and #31, 5-minute implant, abutment and crown procedureIn this particular case were doing three core and crowns and an implant abutment and a crown with full prosthetic impression. The crowns are #20, #28 and #12 and the implant is site no. 13. As you can see on the x-ray, we've got plenty of bone width and depth so we're going to use a 13-mm x 3.7 implant. And one important thing to remember when placing implants and doing crown and bridge at the same time always do all the crown and bridge work first, therefore, you don't get a bunch of slurry and stuff in the implant sites. So we're in the middle of prepping the crown first, getting them ready for an impression. Then we'll place the implant; get the implant ready for an impression and then full upper and lower arc impression. All right, now we're filling some nontoxic filling material where the old mercury stuff was. So we're just going to be doing that. You might taste some couple of funny things in here. So we just did the preparation and core buildups on tooth # 20, 28 and 12. So next we're going to go ahead and do the initial non-flap tissue hole in the gum tissue for no. 13. We are not going to use a mini envelope incisions cause we've got plenty of keratinized gum tissue, which is generally the case with upper premolars and molars. So we're going to do our initial soft tissue access with a special implant drill and a high speed handpiece. We're also going to do the initial 5-6mm of the pilot hole with the high speed handpiece. The high speed is generally the easiest to control the mouth and gets the most accurate initial placement of the implant. So we're going to start by making the pilot hole. We're going to line it up with the adjacent teeth like this, get our parallelism. I want to go right in the center where we want the implant and just make a nice pretty decent hole through the gum. So as you can see we did about 5-6mm into the bone. And we're to go right to our initial implant slow speed drill which is 2.3. Once again it make sense to wind up your parallelism which we'll do right here. Open real wide if you would. Perfect just like that. She's got wonderful bone. So we're right here at 13mm and weve noticed that at about 13mm on the drill which is this particular black line right here that we've met some resistance. So that is the base of the sinus or most likely the base of the sinus. So we're going to go ahead and just place a 10mm implant on that site. We could probably get away with doing a 13mm with just one tooth and 3.7 x 10 should be perfectly sufficient so were going to go ahead and do that. Let me go right down with this drill again just to verify our angulation. That was the initial pilot drill for the implant. We're going to do a one final drill today. So we'll do the 2.8mm drill so well do that final one for the implant right now. Open real wide. Good just like that. And we're going to go ahead and place a 3.7 x 10 implant, dual packaging here. The same thing as we have been doing. Simply open up the top, take it out. The second is sterilized right here. We're going to insert that. Open real wide if you would. There we go. Insert it with a plastic carrier until you met some resistance then you're able to pull the plastic carrier off. And begin inserting with a straight tool. And then if your straight tool begins to bind on the adjacent teeth, simply add an extender on it which is a 2.5mm hex which will insert the implant the rest of the way. So just put an extender on it. It's a 2.5mm extender and that will prevent the straight tool from binding up. We're already at about 20 Newton of force. Right about 30 right here, about 40. Good. Right there. So watch the buccal margin. We're right where we want to be. So that is perfect. What we're going to do is move right into prepping the abutment in the mouth today. We did it yesterday or last footage out of the mouth. But if you're in the mouth I just want to go over this. Make sure you keep copious irrigation as youre doing this. Then just take the lab transfer right off in the mouth. Kelly is holding on to the transfer so when its loose it pops out. Here we go. It didn't take 30 seconds to do that. It can be faster in the mouth if you suction out right here rather than unscrewing and screwing back in. Once again, were going to use a bulk reduction just like a normal crown prep on this particular abutment. It's a preppable, customizable abutment. It's got little diamonds in it. So we're just going to round off the edges here. We'll go ahead and take care to smooth the #14. We just got a carbide to smooth here. And lastly, were going to go around and prep a subgingival margin on our implant prior to impression. Then make sure you free off any extra titanium so we don't create any titanium tattoos around the implant. I spray and actually make sure that were free of any titanium with this instrument. It looks like were pretty clean here. It looks good. And last step, we'll go ahead and use Expasyl retraction after checking the clearance. Go ahead and bite down for me. Good. And you can see our friend has a slight open bite. You can go ahead and open for me if you would. I'm just going to shoot some Expasyl around these preps. One thing Im going to do first Kelly is lets go ahead and do a final tighten. So I'm just going to do the final tightening with, go ahead and open up a little bit. There you go. Do a final tightening on our implant abutment with the straight handpiece. There we go. Did that to about 35 Newton. Go on and bite down. Excellent. So we've completed the crown prep. So we've done the Expasyl retraction on the three crowns and on the implant. And what we're going to do next is take upper and lower impression Blu-Mousse cause there is an open bite. They won't be able to hand articulate this one. And Kelly will temporize the three crowns. We will not temporize the implant. We're just going to leave that abutment right in place. It's in the prosthetics so aesthetics are not a concern. If aesthetics were a concerned and it was a first bicuspid, what we'd probably want to do is just use a flowable composite to lay over that abutment and then when the crown came in we slide that or pick that temporary off using scaler. So it's good practice go keep the abutment and the new implant out of occlusion until the final crown is in place which were going to wait in this particular case how about 60 days. You could do 30 days. And so if that need be we would do that. But that is a three crown course, implant abutment and crown using the 5-minute implant abutment crown technique. |

 FAGD/MAGD Credit Approval does not imply acceptance by a state or provincial board of dentistry or AGD endorsement 7/31/2018 to 7/31/2021 Provider ID# 317928
 Submitting...