Learn From the Dental Industry's TOP LEADERS!
Sit Chairside withDr. Dennis WellsCreator ofDURAthin® Prepless Veneers- OR -
|
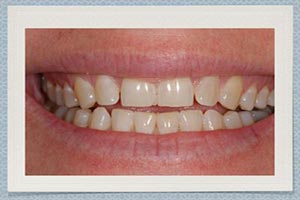
The Art of a Beautiful SmilePart 3 - Preparation Design Continued
Instructors:
Dr. Kirley continues the preparation design demonstration and introduces how he utilizes a laser to control bleeding.
Through my continued education courses and the people that have taught me is you know developing a skill and a technique that allows me to really negotiate tooth structure and to guide my instrument, to guide my paint brush if you will through the palate that I paint. And so learning techniques like that there was a couple of times I tried to kind of show you that. I hope you pick up on that. I found that to be very helpful to me. Your laboratory technicians will always thank you to see those really nice defined margins. What I’m trying to do here is to make sure that I get a very defined margin from my ceramist to follow. Ideally if we can do super gingivally, we want to or right at it and in this case we’re going to be able to do that without having to get subgingival which is nice. Now another thing here is we have a little space between her teeth a little diastema. And so in these circumstances we want to make sure that we take the margin just a little further palatally to ensure that the ceramist has room to design the veneer the restoration in such a way that the anatomical form interproximally is able to close that space in a very natural way. Again following the contours of what the surrounding soft tissues give us. We have altered some of that preoperative through the use of a laser. And I’m going to show you a little bit here in the procedure a little handheld laser, a very small and very effective. Design by a company named Zila. What I like to do, it just add stability if you’d notice. Of course, I got my fingers resting in an area over here and my left finger over here, my index, and I take my thumb kind of act as yet another point of stabilization as I prep. I just find that it gives me a whole lot of control in a real mechanical way to define margins of these fine areas of the preparation. As you can see here I’m kind of just lapping over creating a really fine line just enough for the ceramist to be able to finish that ceramic just under the palatal side here. Obviously, the cuspid is a [0:25:28][inaudible] and so right in this incisal edge here we want to be able to beat that up just a little bit more room for the ceramist to be able again to affect potentially the cuspid rise if we need to have that open and supported in a way that benefits the stability and the wear of a patient’s bite. Open for me real big. Are you okay? So I want you to concentrate real hard for me in just staying open real big. I got down to two teeth here, all right. I’m pretty happy with everything with the preparation thus far. Now the last thing I’m going to do is take finishing disc and just to go through and remove any rough edges and to open the incisal embrasure just a little bit. The ceramist always appreciates the opportunity to be able to replicate the naturalness of tooth structure and a lot of that has to do with what they can do in the incisal embrasure aspect of the preparation. And if we contour this and open this and round this just a little bit then we know that the fit is going to be better. And that it allows them to work their magic a little bit with the creativity into the incisal embrasure area where we can work in translucency and characterizations that really nicely replicate the tooth structure. The other thing you’ll notice on these lowers here that I’m going to do is there’s a little chipping and fragmenting of the incisal edge down here. I’m just going to smooth and polish that real nicely for the patient and will also give us a little bit more definitive point of reference to the incisal edge of lowers to the uppers. Also too you’ll note the incisal edges of these teeth had been chipped and worn. So I’m going to alter the preparation just a little bit. Give us a little bit more of bevel to eliminate that so we can finish the ceramic in a really nice defined way and again to give us the strength that we need in terms of the final restoration in the ceramic. This is a reduction guide of course and what we’re doing with this is kind of determining kind of where we stand after preparation in terms of facial reduction of our corporation. There are a couple of spots I see here that I’m going to have to go in kind of reshape and take a little bit more off to give adequate space that we need. Most of the time what you’ll hear from the ceramist is when there are errors made in reduction it’s usually in that incisal, one third. So the great thing about a reduction guide is to confirm that we have the adequate reduction. If you don’t, you can simply go back in and gain it just as I am. And just a little bit more on the distal facial no. 8. What I’m doing is looking down kind of the buccal corridor on the left side and then I’ll do the same on the right. But I’m trying to visualize relative to the mesial buccal cusp of the first molar, you know, kind of where I stand in terms of my reduction. And I’m visualizing the end product, the ceramic emerging from the gingival margin and then come in occlusally. And I’m trying to see, you know, in my mind’s eye I know I want to build. One of the things we’re going to do is build out the buccal corridors to give a little bit more presence there. So this is just one more perspective that I’m going to look at here and kind of get an idea do I feel that I have enough reduction to give the ceramist to give me what I need here. And obviously because we’re going to be building this out, I know that I do. But it gives me yet another perspective along with the reduction guide, along with reduction matrix that I used in the beginning here. It’s looking pretty good here. I kind of gone in and rounded and modify my incisal embrasure area so I’m comfortable with that. It’s nice and rounded and soft. What I’m going to do now is maybe touch a spot gingivally. This is a laser, micro laser by Zila and this is a fantastic little instrument to use. You can see it has a little LED screen on it. You can adjust the wattage that you want through these arrows that allows you to go to predetermine. You can’t see it here really well but predetermine procedures: troughing, frenectomy, gingivectomy, all of those things are all preset here. So if you want go to it where they’re preprogrammed in just push that little button there and it will take it to the little wattage. It also affords you the opportunity just to set your wattage to what it is that you want. And the great thing too is you can see how the tip of this is. It’s just a great instrument. It’s very light and how this works is these tips are removable and disposable that you can see here. This fits right over the top of the laser and that’s all there is to it. There is a wireless foot pedal to it that you can’t see here on the floor. But it’s so light and so functional it really has made a great difference in how we go in and do what we do in setting up upper cases gingivally and even taking impression by going in and just simply troughing around these areas very gently to expose the margins as we would want them to be in applications that you would need that. It’s portable. It’s the size of my handpiece if you will. And it provides me with the kind of wattage that I need to do the things I do esthetically in my smile design cases. But this is something it is so convenient and so easy to use. Its wireless. I have a foot pedal. I used it everyday. Everyday in some aspect of what I’m doing in dentistry but it’s general dentistry or the smile design whether it’s doing a biopsy or pocket reduction or I’m re-sculpting the gingival tissue or I’m treating an aphthous ulcer. This product has really been a game changer for me and had made things really convenient. Prior to this I always used a laser but the ease of use of that laser was not like it is here. And dentist can be such elements of convenience. And I know often times I would hate to slip that big laser that I had down in one of my treatment rooms all the way down to other and set it all up and do what I needed to do for a minute and a half procedure. This has changed it. This has made it real real real simple. And so for those of you who have lasers or who don’t have them and are looking to maybe invest in that, I would suggest take a look at that it’s really one of those great products. Well this concludes our procedure. What we have done at this poin is provisionalized all the areas that we prepare. You can see that right there. We will certainly take records of the length and of the impression of this to use that as a means of communication to our laboratory technician. I always follow up this appointment with a post-op. And when the patient is not anesthetized to enable us to more accurately evaluate the length that we have and certainly the phonetics of the changes that we made in length can impact the phonetics and the speech patterns a little bit. So we’re just going postop here and in about 24-48 hours evaluate the length again and make sure that our incisal edge position is exactly were we want it to be. And then we’ll convey that to our lab technician for the construction and fabrication of the restorations. Thanks you. Hello, we’re back with our second visit with our patient for placement of her porcelain laminate veneers. But before we get started, I’d like to talk just briefly about the importance of the relationship of the assistant and the doctor and the transference of instrument during procedure. Because I am most of the time working under the aid of loops, my field of vision is fairly limited. So I have to rely up on my assistant to accurately place the instruments in my hand, so I can feel where they are and importantly to be consistent within the placement and the pressure in which she places those instruments, so I can effectively feel them and do the instrumentation that I need to do. What we’re going to do here is start out and just kind of show the position that I put my hands in and my little finger are under the inferior board of the mandible just bit posterior to the chin. And this is my reference of being able to move around and the reference for my assistant to be able to place these. So as she sets down the mirror and the explorer in my hand when I’m looking, even though I cannot see them I can feel that she presses them into my fingers. So we’ll do that again mirror, explorer. And then I’ll have the patient open and then it allows me to effectively operate from a very consistent position that she can count on me being there and I can count on me being there and I can count on her being there and eliminates the chance of instruments from being mishandled or potential drop. And as I go back there I signal that I am going to want a transfer of instrument by leaving where I am inside the oral cavity and moving out like this and transferring the instruments. And each one of these situations, I will call for an instrument typically or if in certain procedures that are really repetitive the assistant will know in advance what instrument I need. But I think the key element here in doing this is just the basics of having a position of my fingers located in the consistent place on the inferior board of the mandible just posterior to the chin and my assistant knowing that my fingers are going to be in that place every time we transfer an instrument. The patient has already been anesthetized so we’re going to start right in. The patient has been in provisionals a little longer than we would ordinarily have them, but she’s done a great job on maintenance of the interproximal tissues and everything looks pretty good. What we’re going to do initially here is isolate this prior to our placement so that we can work in an area that has lips retracted. We use the OptraGate for that. And I’m going to place this in. This is a wonderful adjunct to any restorative dentistry that it nicely reflects the lips and the cheeks and enables me a field of vision. This will enable us the opportunity to go in and remove the provisional restorations to clean the preparations, to do our try in of our restorations and once we established all of that and have confirmation everything looks like we want it to, then we will remove this and apply a rubber dam to get even better isolation. |
 FAGD/MAGD Credit Approval does not imply acceptance by a state or provincial board of dentistry or AGD endorsement 7/31/2018 to 7/31/2021 Provider ID# 317928
 Submitting...