Learn From the Dental Industry's TOP LEADERS!
Sit Chairside withDr. Dennis WellsCreator ofDURAthin® Prepless Veneers- OR -
|
Implantology Breakthroughs for the GPPart 2 - One Drill Implant Procedure
Instructors:
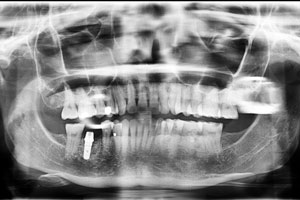
One drill implant procedure, implant sites #4 and #7, final prosthetic solution: cemented, implant retained bridge #4-#7. High-speed handpiece soft tissue approach and initial osteotomy, this procedure is categorized as a five-minute implant, abutme
So in this particular case we're going to be doing implant retained bridge from #4 to #7 and we're going to be placing implant site 4, site 7, and the bridge will be 4 through 7. So we'll be placing the implant today and we're going to be taking the final impression in the same appointment. These teeth were taking out of about two to three weeks ago and it was a bridge that failed. And so, we've got plenty of bone as you can probably see in the panoramic that Mike is going to bring up. So the first thing I do after the patient is numb if its a flapless procedure that were doing is kind of gauge where the bone is with my needle which is the easiest way to sound through that. So lets go ahead and take a peak where bone levels are. So anyway were going to go ahead and check out where our bone level is. So we've got a lot of bone to the palatal. We're heading bone straight down. On the buccal aspect, there was a little bit of bone removal during the extraction so Im feeling theres bone loss here. On posterior implants I like to angle a little bit to the lingual on the maxillary just because that's where the longest and strongest root is anyway of molar or premolar. So I'll angle slightly to the lingual. Our implant abutments are preppable. So we can compensate for that angulation when we do the preparation on those. No. 7 we've got plenty of bone width. I'm checking here on the buccal so we got plenty of bone here, lingual. We're doing well as well. So we're going to place a 4.7 x 11.5 or 13 on the distal abutment and a 3.7 x 13 on the mesial abutment. So let's get started with our high speed approach. So we're going to go ahead and make our initial pilot holes. We're going to line it up based on where this is right here. We're just going to go make our lingual access right here. There we go. Were going to line up #7 with #8 like straight down. There we go. Well go straight into our initial drill for the implant. There we go. Are you doing okay? Good. Excellent. So after I made that initial hole of the bone I like to in fresh extraction site take a look at what weve got for a bone and how it looks in there. So the tooth had some infection in it and the lingual wall is very very thin. He's got great bone right in front of here. So what we'll probably do is put a nice implant in front of that site where theres plenty of bone and since we have two implants supporting it we can cantilever safely up to about 10mm. So we'll actually instead put an implant right in the mesial aspect. So we're going to use a 13mm implant which means we're going to bury the drill down the 16mm which is right here, which we'll accommodate a 13mm implant and roughly 3mm tissue height. Onto our second drill here. Okay so that second drill was a 2.8. Were going placing 3.7 implants. So were actually going to just stop right there and not go to the third and final drill which will be a 3.4 for a 3.7. So we're going to go ahead and make sure that we do not touch the implant itself. We're going to go ahead and place our implant on the second site, first site right here. Just place the implant until you have good pressure, take the plastic top off. Well go the rest of the way with this insertion tool. I like the straight tool for placing maxillary implants, really easy to use and much nicer than I believe the ratchet. Then let's go ahead use a 3.7 x 13 if we could to that other implant. We place the implant just subgingivally from prosthetic standpoint. I'm feeling if I margin the buccal margin and the lingual margin. So we're just underneath the gumline. Thanks Leanne. Take the implant out of the carrier taking care not to touch the sterile implant and well put them in place right up here. There we go. We're just subgingivally. I want to go back to our original extraction and just kind of look around for good bone back here. So were on a buccal. Feel just a very thin fragile wall back here. On a lingual, there is some decent bone. We're just going to kind of clean out some granulation right here. Please pass me a 5.7 by I'd say by about a 10, 5.7 x 10. Thank you. So areas where we've lost some bone I'd like to use a wider implant. So we're actually going to go back there and see if we can find some good bone. And when youre changing drill its important to not touch the actual drill portion thats going to be touching the bone just to maintain maximum disinfection. So we'll go ahead and place that 5.7mm x 10mm implant right in that site. We're going to make sure you put place firm apical pressure on that implant as its being inserted. There we go. Lets see how the bone is in that area. So that implant as inserted into that area there's some movement with the implant. If you ever have movement with an implant generally that implant is not going to make it. So we've gone to plan B which is instead of bone grafting this site the distal site we choose a nice area of bone to the mesial to place an implant. I generally do not cantilever single unit implant but multiunit implants. Recent studies have shown that you can cantilever up to 10mm with no adverse long or short term effects. So we're going to go with that. The bone is much better in the front. It's already developed. We don't need the bone graft. So we got an implant in this distal site, the new distal site, the plan B distal site to about 50 Newton. The one on the anterior went to about 30 Newton just because there was a tooth in there just recently. And so we're going to seat two months before we sit the final bridge. But we're going to go ahead and take the final bridge impression today. So let's unscrew these abutments. We'll cut the green transfer off the abutment. We'll prep the abutments in the mouth to ideal. We'll take a full arc impression upper and lower. We'll do a Blue Mousse to relate the bite and we'll send it to our lab just like a normal crown and bridge impression. So a good question is why wouldn't they make this abutment sort of snap off things like that. You know what I mean. They don't do that because there are a lot of advantages for single units to having this attached. If you do a single unit crown you can actually just take an impression, closed tray, take this lineup that flat side right there, stick it in the impression, send it to the lab, they'll customize this stock abutment. So my lab does a great job with that but they're used to it. I teach this method cause any lab can do it. That's real easy. So once again we're just going to be sectioning the lab transfer off of the abutment making it a customizable abutment in the mouth. So we're going to go ahead and take that off. So what we've done now is we screw those abutments back into the mouth immediately after sectioning the transfer off of them. Now we're going to go ahead and prep those abutments just like normal crown and bridge. With normal crown and bridge if these were natural teeth, we would never cantilever a distal abutment off of that. But of course with the All-on-4 technology that has come about in the last six years, we found that when two or more implants are bond together a cantilever of 10mm is entirely appropriate and has the same or similar success rate to a non-cantilever. So that allows us this option of going in this wonderful bone to the mesial of this site that had less than adequate bone to support an implant. So what were going to do now is torque these abutments down to 35 Newton because when we get that bridge back we'll be able to just go straight to cementing. So we're going to torque this down to 35 Newton. Ain't that a weird noise? Are you okay? That's a horrible noise. It does sound like a screen door, doesn't it? That's a horrible noise. So we're going to verify that these implants are torqued on 35 Newton. So let's go ahead and do that right now. Distal is to 35. And I probably wont go all the way to 35 on the mesial abutment cause I only torque it to about 30 initially because of an extraction site. So I'm just going to verify that its nice and tight in a hand tighten that which I've just done. And when we seat the final bridge in two months we'll go ahead and verify that were 35 torque on that mesial abutment. Okay. So now time to prep the abutment. I recommend using a bulk reduction diamond initially to get the basic prep done and the right angulation taken care of and then just a finer diamond for the final finish work. We're just going to round the top off a little bit here. This abutment is angle slightly to the lingual so were going to go ahead and correct that angulation by prepping the facial or the buccal. So weve got the two abutments trough sufficiently below the gumline about three quarters of a millimeter. We're going to place was over the top holes. Place Expasyl retraction, then take our final bridge impression. Once again the wax is only use to make it easier for the lab. If there's no wax on top the dyes can chip away since the hole is so fine. And so with wax we dont have a problem with that then everything is very accurate with the lab. Well go ahead and spray the Expasyl out. It was only in there about a minute but we have very little bleeding. So we're going to take a full arc impression. Go ahead and open and bite down. We've got plenty of room. We're going to be taking a Blue Mousse as well bite registration in order for the lab to mount this out up appropriately and that is the two implant placement impression and final seat in about two months of an upper right bridge with a compromise extraction site on the distal abutment. And so the nice thing about implant bridges as opposed to normal tooth bridges is we got a lot of leeway with putting teeth on that. In fact they found that an implant can take 10x the amount of force that a normal tooth can for prosthetic and crown bridge work. And so in this particular case of course we've got a cantilever and what would be non-ideal for a normal tooth borne bridge is actually ideal with implants with that cantilever. So once again our other option beside placing it just mesial of the deficient bone site for the distal abutment of the bridge would have been to place a bone graft in that distal site. Lets seat five or six months and go back in. Unfortunately, we still wouldn't have a guarantee that the bone would be solid even six months from now on that distal site. So what we do have a guarantee of is that space just mesial outside had plenty of bone. In this case, great decisions to move right in front of that root site. Place a bridge those implants would be able to take that force and will be in good shape. |

 FAGD/MAGD Credit Approval does not imply acceptance by a state or provincial board of dentistry or AGD endorsement 7/31/2018 to 7/31/2021 Provider ID# 317928
 Submitting...