Learn From the Dental Industry's TOP LEADERS!
Sit Chairside withDr. Dennis WellsCreator ofDURAthin® Prepless Veneers- OR -
|
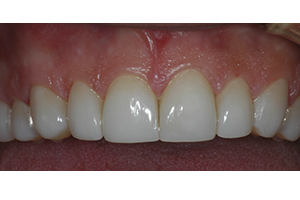
The Principles of Advanced Minimally-Invasive Dentistry.Part 2 - Moshe Mozrachi, CDT builds up the Pearlfect veneer
Instructors:
Moshe Mozrachi, CDT demonstrates the layering technique he uses to build the Pearlfect veneer.
The major component of the system is the restorative material. It’s a unique material that has the nano particle. It is already been tested and proven. It has clinical for the past 20 years that shows a very positive and very good longevity and that is the other layer. This is what the veneer is made of. That material is pretty much exclusive to the [Pro-Fit] system. It is not available in the world of the dental laboratories. And we using it here in conjunction with Kerr scientist with composite material. The application of this material it goes very smoothly and not playing with it too much. Apply it all over the dye. So you’re going to get the material actually protect the stone from being attached to the material at all direction. That’s approximately what would take. Now if you get some get some puddle somewhere I definitely need to remove those puddles so we don’t get too much of a thickness. But this material will be flattened to about 20 microns when it dry which will take about a minute or so. While this is drying, I will actually start laying out the materials and the colors that I am going to be used to create those veneers. I’m using a tray to lay out all the material that I’m going to use. I have this light chill here just to protect it from light to prevent it from setting. I’m going to start out with the layer of a shade that we called opacious B1. This will give us just a little opacity right around the cervical and will enhance the coloring there. That’s what we called warm color. There will be around the cervical area. That would be followed with the shade of B0. B0 is very similar to bleach 8, medium bleach 8. That will go over the layer of B1 opacious. And we will top this up with white translucent material on the incisal edge and cover everything with a translucent incisal material. So we basically are going to use four different layers here to create a veneer in the thickness of 0.3 mm. That’s the beauty of the Pearlfect. That’s how we can achieve tremendous effect of esthetics, mimic nature, provide strengths and yet all that within 0.3 mm. This is something that 20 years ago would have been only in our dream and we actually live in it now. Anytime you add thickness to the surface of the tooth, you increase its size. It’s just physics. You can’t just promise someone to make a veneer without telling them honestly that you’re going to increase the size of the teeth. And our patient of this program we have a very clear instruction. Patient Yuni is insisting he do not want to have thickness or length added to his teeth. He likes them. He just likes to change the brightest. He likes to have a brighter youthful healthier smile. So here’s a big conflict. We not only do anything from his teeth but yet how can we deliver a veneer that it’s not going to change significantly his teeth. On my tray, I placed the four different layer materials that I’m going to use to fabricate the veneer. In this segment, in this demonstration, I will create one veneer completely in order to go to all the motions. So I have here a B1 opacious dentin material. I have B0 body that will go over that. Then we have white incisor and then we have light translucent. All those materials is going to be lay out into the surface of that tooth in a way that will create this amazing combination of shades, color, characteristic and optics that will give the illusion of extremely good looking natural white tooth. Okay. I’m back to my dye tooth no. 8 which we’re going to use for this demonstration. The first layer would be is B1 opacious. So I will take a little bit of that material and flatten it out as thin as I can then cut down the shape of what my cervical part of the tooth looked like and then place it right on the dye. So this is my initial layer and that’s what I called the warmth shades of the veneer. From there it’s going to be only drag into all the areas that it’s supposed to go primarily into the incisor 1/3, into the cervical 1/3 of the tooth. With this material I can manipulate it very accurately to achieve the margins and the thickness without having any guess work. Now as you see here this material is actually over extended into the middle of the tooth which I am not interested to put. So I will go and just take that out of there. And now we have back about incisal 1/3 except it’s still too thick. So we’re just going to thin it down by tapping on it. I can get the material to thin down and feather edge that. Now the objective is to get the layer going up the tooth to feather edge to noting so we can then apply the second layer which is the B0 dentin material. The B0 dentin material will give us the white proportion of the middle of the tooth. For the past four years since I have incorporated all of these little components into the material itself and thanks to Kerr technology and Kerr support, I have been delivering hundred of cases of 10 veneers or 8 veneers per case. The failure rate are so insignificant that it’s hard for me even to give you statistics. I can give you statistics on failures of ceramics. And I can track it down. We have about 2.5% failure on ceramic veneers for the first five years. Now we’ve been four years or even longer doing the Pearlfect veneers. The failures are normally due to occlusion which has nothing to do with the quality of the material or with the technique of bonding. It is all to do with possibly not having correctly finished since the veneer it’s actually ending up on the incisal edge, possibly a bicuspid cuspid. It is very important to smooth this area up and not have that come in direct contact what we called centric stop right on the edge of this veneer. I just completed cervical layer which is the B1 opacious. It is the thickness of approximately 0.10–0.15 mm right on the cervical here. The next layer that I will apply here would be B0 dentin color. Again I’ll do the same technique just flatten it up on the slab. Okay. We’re going to flatten this and create a shape of approximately where the piece is going to fit. It’s going to fit from approximately from here to almost to incisal edge. So what I do I flatten everything here on this slab. Make sure I got enough material and of course not to put too much. And now it’s applied B0 translucent material. And we go to the same motion as we have done with the first layer. Actually I take that and drag it down all the way to where the B1 layer was which this combination will definitely create a warm cervical color. Also the cervical here it’s so thin that some of this warmth effect will come straight from the tooth. It will bleed to some of it to the veneer. That’s on purpose because of the thickness there it’s so thin. And it would bleed right through and it will create a very natural effect. Now what’s left to do is make sure that we are at the right thickness in the middle and toward the incisor. Because we’re going to have to have two more layers to put on that tooth to get the right effect. The incisal material that we’re going to apply here is saturated with opalescent particle that does shine up when it goes to transmitting light with shades of orange and blue. That are magnificent and will give this patient a very pleasing, very natural and very youthful, very beautiful smile. I’m cutting back some of the edges here to create mammalons because we want to have the translucent material going into different thickness here. When it gets a little thicker we will basically get the translucent more noticeable. When it’s a little thinner it’s less noticeable. Okay. We have the two layers blended together now to basically create this transition of B1 warmth color around the cervical into a white B0 middle with a couple of mammalons that are noticeably here on the incisal edge. Dipping the instrument with some modeling resin sometime help manipulating the material and not causing it to stick to the instrument will help out. Again, along the line on the same method as I was describing before flattening the material up and just pick up a small piece that will actually be layering that we’re going to layer right on top of your, that material will have to be filling in some of that mammalons to create the effect that we want here. As you’ve been observing here we are in our third layer of material. We haven’t really reached the 3/10. I don’t believe so. I think we’re only on 2/10 for the whole thing. This is unheard for any veneer to do that kind of effect, optical effect all kind of coloring and artistic result with so many different materials all within this thickness. That white incisal actually filled in the mammalons very nicely, completed the shape approximately of where we want the veneer to be. It’s going to end up on incisal edge right on top here which my instrument are really thinning it down taking it to the other side which then comes to that side and you can see the die right through the veneer and then we’ll clean up the excess material. So that is basically the final layer before we’re going to put the translucent material all over this veneer. The translucent material as I said before will be, just the final layer to give another dimension to this whole color combination. |

 FAGD/MAGD Credit Approval does not imply acceptance by a state or provincial board of dentistry or AGD endorsement 7/31/2018 to 7/31/2021 Provider ID# 317928
 Submitting...