Learn From the Dental Industry's TOP LEADERS!
Sit Chairside withDr. Dennis WellsCreator ofDURAthin® Prepless Veneers- OR -
|
Implantology Breakthroughs for the GP Part IIPart 3 - Five maxillary implants using three efficiency techniques with a final prosthetic.
Instructors:
Three efficiency techniques with a final prosthetic of a removable, implant retained denture.
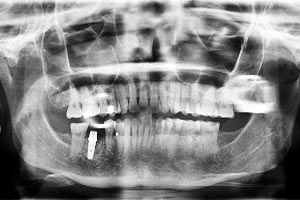
This particular case we've got upper denture that is not fitting very well and issue with a gag reflex in the back. So what we're doing is five upper implants, conventional implants both 3.7 and 4.7 diameter using locators on top. And we're going to make a snap in denture out of it. And we're going to take off the palate make it a horseshoe, make out of it a whole lot more nice to eat with. And so we're going to be using a few different efficiency techniques today. Of the top five flapless techniques, we're going to use the high speed approach. We're going to use the high speed approach from both the soft tissue access and the first 5 to 6-mm of the pilot hole. So like we've talked about in previous shots here, that is the implant bur for the high speed which we'll be using today. So if you're looking at the panoramic x-ray right now, we're going to be placing a 4.7 x 8 site 2. Site 4, we're going to do a 4.7 x 8. Site 6, we're going to do 3.7 x 11. Site 11, we'll probably end up doing a 3.7 x 11.5. And then site 13 as you can see the sinus comes down very low right about where 14 is. So, we're just going to sneak right in front of the sinus. Now it's important to look at any anatomical landmarks and kind of palpate the ridge in the mouth and look and see if you can assimilate where those anatomical structures are below the bone. In this particular case, we got really fortunate. On the x-ray, we saw a little piece of amalgam. And in the mouth there's an amalgam tattoo. So we know that just about 4-mm distal to that amalgam tattoo is an ideal place to place the distal implant on the upper left. So let's get started. We're going to use a few efficiently techniques and we'll go for it. So we're going to go ahead and start back here with site 2. We're going to palpate the buccal, the lingual buccal right here. So we're just going to do right in the center right here. I want to make a pretty good hole for a 4.7. And then we'll make our initial bone access there. No. 6 is here so we'll do another right here. And up on no. 6 buccal lingual right about there. Are you doing okay, Tom? Good. Six is right here buccal lingual. I'm just going to palpate that with the drill. Find a middle [torque]. And here's our amalgam tattoo. We're going to palpate the buccal. Here's a good position to look at the x-ray one last time. There's an amalgam tattoo. Right here is a nice position. Okay. Good. So now we're going to go around with our pilot drill in all those areas. And for these we're going to go down about 11 mm. It looks like we're already there. We'll go right to the sinus. Good. There we go. So we'll go do a little over 13, 11. There is an 11.5 right here. So we'll just kind of go right to about 13. I feel the base of the sinus there. And back here we're just going do an 11.5 so we'll go all the way to, here we go. We'll actually change that to a 10. Okay. Our next drill we're going to place the 3.7 right now. So this is 2.8 so we're just going to go to this guy. Just pass the 13, just pass 13. We're just going to go to 11.5 on that one. I want to do a 10 cause we're right at the edge of the sinus. So take your implant out of the carrier. We got 11.5 here and we're just going to insert that to our #6 position until we have some resistance. And then take your straight tool and then you can insert it the rest of the way. Upper bone can be a lot less dense. It can be type 2, type 3 bone which we found today. So you're going to drill a full drill short of the final drill. So we actually use and stop at about 2.8 instead of going to the 3.4 for a 3.7. This is 11.5. Okay. Yup. We'll do that 3.7 x 10. You bet. We'll use one of those as well. So we're going to put #11 in right now. So 11 once again we're using 3.7 x 11.5. We're going to watch the margin. Margin below the gumline that means our implant is at the bone level. Good. And finally we're going to use this 3.7 x 10. We're right at the edge of the sinus here with this one. I could feel it as we're going down there. So we'll go ahead and we switch from using a 3.7 x 11.5 to a 3.7 x 10. Here we go. It feels good. It feels good. So the last two are 4.7 x 8. So of course we need to go a little wider for those. We're going to go to a 3.4 drill for both of those and so finish this off. Good. So we got our 4.7 x 8. We're going to take it right out of the carrier. Be careful not to touch the implant. We're just going to insert these directly with the straight carrier. So use a lot of apical pressure when you're inserting into a much smaller diameter drill hole. So once again, we've used the 3.4 for a 4.7 that being a 3.4 drill. And so we've got good pressure right now. Going down all the way. Good. That feels really nice. And once again with this distal implant, we're going to use this straight carrier. Are you doing okay, Tom? Good. That might get just a little more length than that distal implant and we're still going to use a 4.8 but we're going to go ahead and go just a little deeper for that 3.4 here. That will allow us to have what's called bicortical stabilization which is accessing that floor of the sinus bone which is really hard bone. We might go actually slightly wider on that. We're not engaging in the cortical plate. We're going to go just a little wider from 3.4 to a 3.8 down there, just a little bit. Just a little bit. See if we can get a little bit more torque on that implant. The softest bone in the mouth is the posterior of the upper. So you really want to get a good [pressure] there. That bone I think we're going to want to use a little more firm bone for our case here. We decided to place a fifth implant in there in case one of them didn't work out. As you can see, we've got ideal position on the 4. So we may elect to not place a fifth but I think we're going to go ahead and place the fifth. We got plenty of room between these two guys for a 3.7. So I think we'll go ahead and place one right on that amalgam tattoo a 3.7 x 11. How does that sound, Leanne? All right. Let's do that. We'll just get a fifth in there. Why not. But first of all, what I'm going to do is take our abutment off of here. Leanne for a locator on that distal abutment this side I think we'll probably use just 1-mm locator when we do that. Yeah, just a healing caps today. On that distal let's actually put a cover screw on that one. We'll finish up this left side. We're just going to go ahead and put some healing caps on it. If we have the right length locators, we'd probably just put those on right now. But we're going to just going to see where that tissue heal so we can put the ideal link locators on there. So I'm going to leave this for angulation. We're going to place that fifth implant right now. So we're going to go back to our high speed. Once again, we don't need to place a fifth but let's have an extra one. Let's have an extra one. So line it up with your previous implant. Go straight down. We're going to take that amalgam out while we're down there. So we're going to start out with our 2.3 drill here for a 3.7 implant. Line it up with our adjacent tooth, our adjacent implant. It's 11.5 we're going to be doing so we'll just go to about 14 or so. Now, we'll go to our 2.8 about 14 or so. And that should be sufficient. We'll go ahead and put a 13 x 11.5 in there. Once again in unwrapping this, just unwrap the top part. The second one is sterilize. Take care in not touching the actual implant; insert it in a straight tool. And we'll get our fifth implant in place. And watch the margin line cause that will tell you where the implant is in relation to the bone. So our margin is just subgingival which means our implant is right about bone level. We'll go ahead and take these last abutments off. In about a month or a two, we will go ahead and take the healing abutments off and place the locators. Do our modification of the dentures so we'll rout out that denture in the areas of the implants. We'll do a hard reline of the denture. Trim a bunch of the acrylic off. We'll utilize the same denture. And we will be in good shape to eat most everything we want. And I did angle the distal on the upper left slightly to the mesial cause that's sinus there to get right out on the edge of it. So you'll see we're going to right on the edge of the sinus on that far back one. This one was closer to the surface because we're real shy on bone, the 8 mm. If we would have gone a little further, it would have been right in the sinus. We kept it short. I put a healing or cover screw as opposed to a cover cap I'd say just so it didn't stick up too much on the denture sake. So, here's our implant that will heal just normal like an extraction site. We got five implants in place and we're going to be ready in a couple of months for a denture without a palate. |

 FAGD/MAGD Credit Approval does not imply acceptance by a state or provincial board of dentistry or AGD endorsement 7/31/2018 to 7/31/2021 Provider ID# 317928
 Submitting...