Learn From the Dental Industry's TOP LEADERS!
Sit Chairside withDr. Dennis WellsCreator ofDURAthin® Prepless Veneers- OR -
|
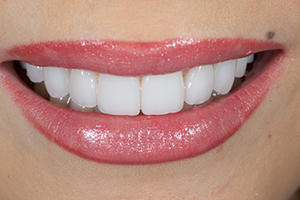
No Prep Veneers Part IIPart 3 - FinishingOkay so we just finished up bonding in these veneers. We polymerize them real well. We've taken a scaler and cleaned up the margins and now we're ready to shift into a real intense finishing stage which is a requirement when you do prepless veneers. Obviously be definition these are additive only so it's the burden we'll call it to go in and finish these margins and finish these veneers, take them on to the house as we would say so that everything is appropriate and in that the margins are undetectable, both visibly and to the explorer. We like to refer to these as the infinity margin. I think it's the ultimate in terms of a dental restoration because they feather into this infinite margin that is difficult to see, difficult to feel with the scaler and it's biological very sound and it's visibly very attractive. So this whole process is something that we have evolved and refined through the years and we're going to walk you through here step by step at this time. So the first thing we're going to do is take a mosquito diamond, a course mosquito diamond and we're going to go in and refine these margins and smooth the ceramic, the resin cement, and finish that to where again it's undetectable to our explorer. So we usually start back here in the bicuspid area and work our way forward. Sometimes we use a little water for the one real heavy with this. Sometimes we'll stay dry where we can see better. It's less ñ if your anesthesia is wearing off then it's better to maybe use a little water for comfort reasons. But I like to take it one tooth at a time to ensure that I've completely blended this. So that's starting to feel pretty nice just a touch more there. Since our veneers stopped just short of the gum line in most instances we can do minimal damage to our gingiva by just using this mosquito diamond which is very pointy. It gives us real nice working area that we can blend this without again getting on the tissue. If you find that for some reason you're a little more subgingival than planned or if you find you're struggling not to get on the tissue then we can use a retractor called a Zachary retractor that will allow you to push the tissue up. I'll demonstrate that now. This is a great little instrument that will help you again push the tissue back out of the way and then you can take your burr right down through the marginal zone. So in addition to shaving up the margins we're also looking for any contrary adjustments that might be needed particularly right here in the cervical 1/3. So for this cuspid for example, this prominence here in the cervical 1/3 we're going to take that back just a little bit. Not to worry we're going to eventually smooth all of these surfaces to a nice shine again. Once we've got the facial area pretty smooth, then we're going to touch up the lingual and do the same thing there. Here we will use a football diamond in this instance, we'll use a finishing diamond, red stripe and we'll go in and just blend the ceramic and the resin to the tooth surface. We will come back later and refine this as we dial in her occlusion. But we for sure want to get the flash off and have a real nice smooth transition from the very beginning here. Okay. Very nice. Okay the explore. Okay. So now we have things feeling pretty good here from lingual side as well as the facial and it's time now for us to take a serasol or some type of inter proximal sol and pass between here. Once you've cleaned the facial and lingual areas as we've done already this becomes pretty simple and easy top pass through the last little remaining bit of lingering cement. So once we've got the facial and lingual surfaces smoothed off with our diamond, now we're going to do the same thing interproximaly. We're using little diamond strips, coarse strips with the objective being to smooth this inter proximal area so that it too, it has an infinity margin when we feel that with our floss or as much as we can with an explorer. Okay. Come back and check that with our floss and be certain that feels really smooth and appropriate. So now what we've accomplished is we've got all of the margins smoothed off with a fine diamond both on the palate and on the facial side and then we take in our diamond strips and go on in inter proximally and smooth that to where now it flosses very readily and feels very smooth and consistent. So now we're down to finishing, refinishing and refining some of the final shapes and design and so forth and then refinishing the areas where we have the diamond scratches and turning that back into a nice glazed finished result. So one of the things we're going to do as we look at her veneers very critically now is look at her original teeth. We look for that not necessarily to do duplicate her original teeth. We're looking at a photo here in our computer, but more so to give a slight little roadmaps of things we might want to do to keep the basic character of her teeth intact while at the same time enhancing and improving the alignment and shape and so forth. So one of the things that I think would play out really well for us is just to take the median quarters of 8 and 9 just a little bit. So I'm going to do that just a subtle little enhancement that I think will take us a little closer to where she was originally and very easy procedure for us to do. So we're going to take a white stone so we can be very slow and methodical. And add what I would term a little bit of softness here. This little small 943 disk is very helpful sometimes to just refine and perfect the sisal and bracer areas. Let's have this, the diamond strip here. So now that we have finished with the smoothing of the margins and the contouring and the opening up the embracers and so forth, we feel like we're in the ballpark with the overall aesthetics and fit and finish of this. So now as we're starting our refinishing of the ceramic where we have been using diamonds to smooth and feather it, we're using a 7901 carbide burr, a flame shaped finishing burr, a real workhorse for us in our practice. I use this burr for so many things but it is thin enough and pointy enough that we can get it around the inter proximal areas and around the margins and our whole goal is to simply remove the scratch marks that the diamond made in the porcelain. So we're going over basically the same exact area that we did with the mosquito diamond but with a different purpose this time, the purpose being again to smooth this ceramic and start that process of refinishing. Okay. So once we've removed the scratches from the labial surface, then we're going to turn around and do that on the palpable area, the lingual using again a carbide burr. This time it's a 12-fleeted football. Same idea here though because it just get rid of the scratch mark. Right in this a pretty low RPM too especially on the lingual. Okay. Once we've gone over it with the carbide, now we're going to start using some abrasive cups and points. This is an Ivaclor porcelain polishing cup. This is the course grip. It allows us to get in here real close to the gum line without damaging and begin the process of glazing. Our next step is to take a diamond impregnated silicone wheel and we're going to sharpen this just running it against the diamond burr to get a real knife edge thin shape. |

 FAGD/MAGD Credit Approval does not imply acceptance by a state or provincial board of dentistry or AGD endorsement 7/31/2018 to 7/31/2021 Provider ID# 317928
 Submitting...