Learn From the Dental Industry's TOP LEADERS!
Sit Chairside withDr. Dennis WellsCreator ofDURAthin® Prepless Veneers- OR -
|
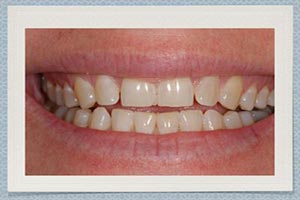
The Art of a Beautiful SmilePart 5 - Final SeatWe’re going to prepare the tooth surface now for bonding and what I like to do here is do a couple of different things. Initially I’m going to go in, open for me, and I’m going to take a wetted gauze and place it at the back and we’re going to use a micro-etcher to kind of cleanse, further cleanse and etch the surface of the tooth. This is tremendous in really preparing the tooth structure and cleaning off maybe little bits of resin from the provisionalization that might still be there. You might do this in advance of etching. And then we’re going to rinse this real real thoroughly. And again all of these little particles here we want to make sure they’re not are not anywhere on the tooth surface. And so I use the air, water, spray. Open for me Kath. We’ll get all that. Just keep breathing through your nose. You’ll notice I’m always kind of placing a gauze in the back of the rubber dam. This is just to minimize the amount of debris and water that it gets back into the oral cavity. We’ve [0:53:08][inaudible] it a lot by just nature of the rubber dam that we have an environment here that now it’s real conducive to our procedures for preparing the tooth surface for the veneers. All right, we’re going to place our etching and we’re going to do a wrap and cementation technique here but we’re going to prepare our teeth here with the etching. Turn your head on my side. We’re going to start posterior and move to the anterior and trying to stay off of any tooth structure that we don’t want bonding material to adhere to. So, I’m going to do this two a time. We’re going to leave this on for about 15 to 20 seconds. And I’m going to go in and agitate this with a brush that just gives us a more thorough coating of the etching. After we apply the etching, it’s hugely important for those areas where the dentin is. Over drying will cause collapse of the collagen fibers that are within the dentin which results in a dramatic effect in bond strength and the potential for postoperative sensitivity. So we guard against that real closely. Now these centrals are predominantly enamel. I’m going to leave the etching on just a little bit more here. We can afford to do that in the enamel compare to dentin. Dr. Kirtley will continue to etch the teeth from posterior to anterior two at a time for 15 to 20 seconds. We’re kind of pulling the light back and subduing it just a little bit because I don’t want it to prematurely set up the bonding agent as I’m placing it on the teeth. But what we’re doing here initially is using Gluma here is a desensitizing agent. This is a product that’s available by Heraeus. I’m just putting a nice thin coating there then I’m thinning it out with my brush making sure that all the surfaces are covered. And now we’re going to follow that up with a bonding agent. What I’m doing is adding this, making sure I thorough cover it. But at the same time I want to thin it out with a brush. I don’t want it to be pooled. I want there to be a nice smooth uniform glossy appearance that signals that I have a good cover and that I am going to have a nice bonding environment. Paying careful attention to that marginal area along the gingiva. It’s easy to miss some spots there. So I kind of really push that down and around there and again being careful too that we don’t create any bleeding in that area. That’s our [0:56:37][inaudible] and we’ve painstakingly gone through and try to ensure that. But in these bicuspids area that I’m working in because we have to do so much reshaping of the gingival tissues and because that’s not you know… Now we have kind of allowed this to set for a good 60 seconds most everywhere and I’m going to take the air and I’m using Clean and Dry air. This is dedicated air syringe that I have that I know the air coming out of is dry and clean and free of potential contaminants. Now a lot of times what I’ll do is hold my mirror behind and blow into my mirror and indirectly come up the lingual and in between. And you could see by the appearance of teeth, you can see how nice and uniform and glossy that is. And now what we’re going to do is go through and light cure this. One of the thing that I use, I kind of go to an art store and I buy because I find it to be really helpful is these sable brushes. This helps me to remove the excess resin cement that will be on here before we cure it. We’re going to seat these from anterior to posterior. It’s kind of the technique that I use. How I do this is this way. My assistant will hand me the veneer in the palm of her just like you see right there. And I will take it and then I will add material to the inside of the veneer, thin coating. She will recite to me what number that is. And then I will always take a little bit and little bead of the resin cement around the margin and then I will just gently place that in. Let it go to seat. I’m going to do that with these central incisors. As you can see as I press this to place I get this nice indication that everything is being flowed and thoroughly covering the internal part of the restoration. I’ve got my other assistant on my right hand here. I’m handing her my resin syringe and she’s also helping me for any other thing while Christy is placing and handing me this in the order that we predetermine. I will get to the point where I will start to get into the posterior areas and what I will do is then just completely finish that segment. Turn your head on the right side there. You know some offices will have their assistant load this and do all that. But my feeling on that is this. It’s one last move I got to make to take it out of her hand with all that resin in there and sometimes it can get pretty messy and so we just try to do it this way and we find that we can control things a little bit better if we do it that way. Cause it can get pretty slick. Sometimes these bicuspids could be a real challenge and I’ll just choose to cover the prep with the resin material rather than trying to put it in. And you can clearly see how we have a nice reveal of this resin coming up underneath around the gingival margins and we know those margins are full covered by the resin cement which is what we want. And now what I’m going to do is just gently take cotton rolls and kind of remove the excess that exist around the margins and try brushing from the restoration toward the gingival margin. And I go through a lot of these cotton rolls in the process cause I really don’t like to have a lot of mess to clean up after we cure. So you can see how we’re getting with that. Now once that’s done, I will supplement that by going back in and gently kind of removing interproximally as much as I can with a sable brush. My assistant is wiping my brush as I go. Now what I’ll do here at this point is prior to tacking these in place is take my mirror and look at the incisal edges from the occlusal perspective to make sure that everything lines up real nice and doesn’t indicate that there’s maybe a veneer that’s displace. Now this particular part of the procedure here is huge and what I want to do is I like to use my crown expander. And I’m going to apply pressure in three perspectives. One from the facial lightly, one from the incisal and then my assistant will go in. And as I do that, some of the excess cement will exude from internet and then she’ll take the tacking tip and hold it kind of apply a little pressure right at the cervical. And she’s going to tack that for just a few seconds to make sure that we’ve got good curing right there and that’s not going to move. We’re going to do that with each restoration almost in the order that we place them. I’m placing incisal pressure, facial pressure and she at the cervical. At this point, we’ve spot tack everything in place so we know it’s secure. And it looks good. We’re not getting any bleeding or anything. And now what I’ll do is take this little cotton pledgets and maybe moisten it maybe with a little bit of bonding agent and go back in and clean the palatal aspect where this cement kind of exuded on the backside here of the veneers. This is all still uncured so it makes it easy to do this. Clean up really becomes a breeze. At this point, we’re going to go through and kind of clean off everything interproximally. And so I still like to have my assistant apply a little bit of light apical pressure. And I’m going to slide my floss real gently and just gently move it back and forth feeling that I’ve got a nice margin in there that’s smooth and she will immediately then take tacking tip and go right interproximally and cure that. If we get a little bit of bleeder this just stops and seals everything. And so we’re going to go down this side and again I’m going to gently go in and kind of bend my floss around up and down. This is the part of the procedure where you do not want to be in a hurry. I mean you’d done everything beautifully to this point and it can all backfire on you if you don’t take your time through this. We’re completed with everything at this point. We polished. You can see this is just immediately postop. A little bit of gingival irritation in a few of these areas and with good home maintenance in the next 10 days to 2 weeks using her ability to floss now cause she’s not in her provisionals and to use good stimulation with a toothbrush along with we supply our patients with a Hydro Floss during the provisional phase and certainly something they would use routinely afterwards. That's our final result. |
 FAGD/MAGD Credit Approval does not imply acceptance by a state or provincial board of dentistry or AGD endorsement 7/31/2018 to 7/31/2021 Provider ID# 317928
 Submitting...