Learn From the Dental Industry's TOP LEADERS!
Sit Chairside withDr. Dennis WellsCreator ofDURAthin® Prepless Veneers- OR -
|
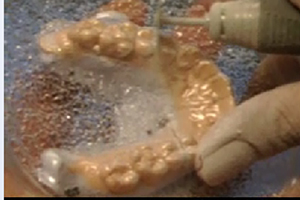
Anterior Bite Plane AppliancePart 3 - Fabrication of the anterior bite plane appliance part II
Instructors:
Dr. Brady continues the step by step process to fabricate an anterior bite plane appliance.
So now this is what we're going to get out of our Ministar machine. And so the next thing to do is simply trim this to where we need. So I'm actually using a Brasseler appliance kit and it has this bur in it. It sort of looks like a little circular sublay and I find that it's the best thing to cut this out with. And so we're just going to simply get it going. How I'm going to do this is I'm actually going to cut about halfway up the labial. So I've actually cut all the way through into the model about halfway from the incisal edge to the gingival on the labial from first bi to first bi. I'm now going to just cut between the first and second bicuspid. And then on the lingual actually we want the Biocryl to stay all the way at the level of the gingiva. And then I'm just going to check and see if I've actually gotten all the way through and I have because this is actually now going to become my anterior bite plane. So I no longer need the rest of that model. If I wanted to I could actually go back now with a regular e-cutter or an acrylic bur and I could trim some more of this plastic. So I usually round the corner where I change direction with that other bur. I may trim a little bit closer to the gingival margin on the lingual. I don't really want to Biocryl covering the tissue cause it can be an annoyance to the patient. So I try to get pretty close to the CEJ on this lingual. And as I said I've gotten so I'm probably about halfway up the labial surface. Now an important next step is to actually kind of get the fuzz off of there. So I'm sure if you use Biocryl before you're very familiar with the fact that it doesn't cut very well at the edges. Well this is a Scotch-Brite from Brasseler. Great Lakes make something called the Diamond Wheel and any of these Biocryl materials if you want to polish the edges or get rid of the fuzz this is just absolutely the best thing to go back on here with. And it will get rid of all those little basically pills of acrylic and makes it nice and smooth and polish for the patient's tongue. So now you can see that we've gotten rid of a lot of that excess. All right. The next step is now I'm going to actually put our platform back on here so that we can actually make our bite plane. So the first step for that is I do want to air abrade all of the external surfaces of the Biocryl where the composite is going to need to stick otherwise it won't adhere. So I'm simply using 50 micron aluminum oxide and I'm simply very aggressively air abrading all the way from the gingival margin of the Biocryl right out over to the top of the incisal edge. And I'm going from canine to canine which is where I'm going to put my composite. And you can see now I have a nice frosty appearance so I know it's well air abraded. The next thing is just to kind get that residual dust off of there from the aluminum oxide so this is just a 2x2 that's been wet with rubbing alcohol. Now in order to adhere the composite we're going to need something a medium in between. And so I'm going to use dentin adhesive and that's what I always use. You can use triad adhesive but I use dentin adhesive. Anything that is not self-etching will work perfectly for this. So it can be the fourth generation where the resin is separate or even some of the other generations were the resin and the primer are together as long it doesn't have the etching. In this particular instance I'm going to use this is just the new iBond Total Etch from Heraeus and I've just got a micro brush and I'm just going to very generously paint the dentin adhesive over all of the surfaces where I air abraded. And I'm going to leave this uncured as we now place our composite. Now when I do these appliances I actually do use composite. You can methyl methacrylate if you wanted to and then you wouldn't need this dentin adhesive step. You would use the monomer. You can also use triad. The reason I use composite is because of how it polishes and how smooth I can get the occlusion. It does take an entire tube of composite in order to do this. So you want to make sure that you've incorporated that in the fee that you charge for the appliance. That's what I'm going to do is I'm going to express the entire tube. I'm actually going to work the composite in my finger for just a moment. The temperature for my hands will tend to soften the composite a little bit, make it a little bit easier to work with. And I'm going to try to get it into a sort of a hotdog shape that's about the distance from canine to canine. And then I'm going to start adhering it to my appliance. The next thing I want to do is just make sure that I can work on the appliance. So I actually coat my fingers in some of the dentin adhesive so that I have a slick surface. So it's not sticking to my fingers. And you can also just put it on the appliance. What I want to try to do here is I want to create a nice flat platform. I want it to be up just above the incisal edges on the labial surface. So I don't want it miles high but I do want it up over that incisal edge of the Biocryl. I want it flat as best as possible in an AP direction. So if you notice I'm trying to flatten it from a point of using her posterior occlusal plane. And then I'm going to get it all the way down to the lingual margin of the Biocryl. I don't want the patient to be able find an edge between the composite and the Biocryl that will then annoy their tongue. And the whole time I'm watching to make sure that I have adequate AP thickness. So probably about 6-mm or so from the labial edge to the lingual. I may be able to thin it some in the mouth once I've adjusted the occlusion but that gives me a nice amount of working room. I've got plenty of time. This is a light cured material so I can play with it as long as I need to. And once I have it where I want it then it's just simply a matter of light curing and then we'll be able to do our adjustment. |
 FAGD/MAGD Credit Approval does not imply acceptance by a state or provincial board of dentistry or AGD endorsement 7/31/2018 to 7/31/2021 Provider ID# 317928
 Submitting...