Learn From the Dental Industry's TOP LEADERS!
Sit Chairside withDr. Dennis WellsCreator ofDURAthin® Prepless Veneers- OR -
|
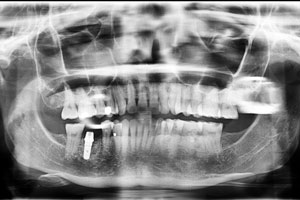
Implantology Breakthroughs for the GPPart 3 - Efficient Implants with Crown and BridgeAll right, our next case were going to be doing is implant site no. 18, no. 20. Were actually going to be doing a bridge no. 21-23. As you can see down here we got a buccal bone defect where no. 22 was from a long term infected tooth down there. But we got plenty of bone site no. 20. Im just going to go palpate the bone. We got good bone in the buccal. Our lingual bone is right here so we got plenty of room. We could do a 4.7 but well do a 3.7. No need to stress it. No need to work the edge. Well do a 3.7 there. And then the back we got plenty of bone site no. 18. We look at the lingual lot of bone, buccal plenty of bone. So well go with the 4.7 but something a little shorter an 8mm. That will allow us to stick to what I called the 6mm rule which is always staying 6mm from the mandibular nerve. If youre always staying 6mm away if you do error and go 2-3 more millimeter then youre still fine. You got a 3mm buffer zone. So thats why that were going to use 8mm implant for no. 18. So whenever were doing crown and bridge and implants together always important to do your tooth preparation before you place the implants. Therefore you dont get any of the tooth debris into the implant site so around that. So well go ahead and prep that bridge first which were doing in the anterior here. Our other option was to extract no. 21 and cantilever to 20 and 21 implants, a 22 pontic. But a bridge in this case is perfectly fine and thats what we elected to go with. So lets get started. Just let me know if you feel anything okay. Do you feel anything? Good. So weve got a little buccal defect. The mucogingival junction as you can see has moved in about 2mm. Were going to be placing a 3.7 implant. So were going to just kind of smooth that keratinized tissue just to the buccal slightly here. So well do that. There we go. Just a little flap of that keratinized tissue. There we go. And on no. 18 same situation. There we go. Good. Thats good. Doing okay? Good. So weve done two mini envelop incisions on site no. 18 and 20. Were going to go ahead and do our initial pilot hole with a high speed actually. So why dont we go ahead and do that. So one thing were going to line up our drill with the adjacent teeth. Make sure we got the parallelism wed like. There we go then right back here. Then once again verify the buccal lingual bone aspect using the high speed. There we go. We got our two pilot holes taking care of with the high speed. Were going to be doing 3.7mm x 10mm implant on site no. 20 and a 4.7 x 10 for no. 18. There we go. So were going to estimate about 3mm of tissue which means well go down a total of 13mm drill length for the site no 20. Site no. 18 were using 8mm implant. So were going to go down about to 10 or 11 maybe 11.5 in depth to accommodate some soft tissue. So well do that on no. 18. Always guide it with the tooth in front or adjacent. There we go. Good. So now we simply go to our second drill in the series which is generally a 2.8. So well go down the 13 with the 2.8. Watch your depth. There we go and the same thing with the distal. Good. Moving right along our third drill which is a 3.4mm diameter. What were going to do is were not going to use the final for no. 20 the entire length. Were just going to go about a third the way in. Just do that initial cortical plate right there. Then were going to go ahead and place our implant, our 3.7mm x 10mm implant for that site no. 20. So we just take him out of his carrier and we go some plastic thing that we can hold onto. Well go ahead and seat that in there. I use an oscillating motion to get them going and then simply go till you have some tension and then take the plastic carrier off like that. And then were going to torque it the rest of the way with our torque wrench. I bet you feel like a car right now, dont you. Kelly lets use a 2.5 if youd be so kind and well do it the rest of the way. Sure that sounds good. So this basically just extends it so that the torque can go around the tops of the adjacent teeth. So were going to watch our buccal margin. Were just at the gumline so well go a little bit further down make them just subgingival. It looks pretty good down there. So were about 35-40 torque on that guy. So the reason I took a break and stop drilling on the back one is the final drill that youre going to be using that site you should immediately keep that site as free from saliva as you can or any other stuff and immediate place that implant. Now well go ahead and finish out drilling the 4.7 x 8 for that distal. Do you want the 10 or the 8? 4.7 x 8. So were drilling down about 11.5 on that distal. So that was a 3.4. Now were going to do a 3.8 which is our next up in the sequence. And the final drill is a 4.4. If the bone is real soft I generally dont go to the final drill. That allows us to torque it tighter. In this case, he has a really good solid cortical plate. So were just going to go through that cortical plate with our 4.4 which is the final drill for the 4.7. There we go. Now well go ahead and place our 4.7 x 8. And this particular implant company were using today has a dual sterilized package and it is OsteoCore that were using today which is very similar to a lot f the internal hex company like Zimmer or Implant Direct. So take out its carrier implant. Just be careful with him. We have very little bleeding there. So were going to torque that implant into place. So its getting tight with the plastic carrier. Once it gets pretty tight. Youre able to pop it off. And we will go in with your hand tightener. Just a little pressure here. Were watching the buccal margin. Were about 40 maybe 50 Newton right here. Really solid bone. So what were going to do is were going to take a look where were at. It looks like our position is nice. We angle the abutment as you can see a little bit to the buccal, toward the buccal. Thats because sometimes a lingual root concavity. We have plenty of buccal bone. So when you can, go to the area with the most forgiveness. So we did that so you can see its canted a little bit to the buccal. Were just subgingival on the lingual. Were right out the gumline on the buccal way far back like that. I dont mind it right at the gumline. So we look very good right there. Of the instrument that you use when you initially take the transfer off use the longer hex that gets all the way down there and can unscrew that top part. So just put them on the finger tightener here. Unscrew those abutments. And what were going to do is section the lab transfer off of those. Were going to customize those abutments today and take that impression directly. If we werent training today, what Kelly would generally do is I might be in the room doing hygiene and Kelly would actually section these abutments which is legal under board rules in most states. So well do it together right now. Once again, were going to section the top part of this off. So easy as that. It took me 10-15 seconds. Now we got a customizable abutment that came packaged directly with the implant. Once again, whys the transfer on here. If we wanted to we could have taken a closed tray impression then taken this off after the impression, stuck them right in the impression. This is a direct approach. When you can do the direct approach more user friendly, easier on the lab, less room for error and a lot of folks have switched over to doing it this way. Okay. Now we got our 3.7 for the anterior implant. We got a 4.7 for the posterior. Im just going to clean out any little metal spurs on the holes there. And lets get a shot right here what it should look like. So were using minimally invasive techniques today. As you can see back here there is actually more of a gum bruise where the shots were than the implants as you can see kind of darker, so really minimally invasive. You can see the nice keratinized tissue on both the buccal and lingual aspects of these implants. So were going to have really nice tissue result when the final prosthetic come in place. And so well slide this on top. And in fact Im going to have Kelly do that. Her fingers are very skinny, nimble and shes been doing lab stuff for 28 years. Her dad started a lab. So shes really good with her fingers so by all means if you can have your assistant do a lot of this work do that. So Kelly is inserting the abutments on the implants now. And what were going to do is were going to cement these crowns on this next appointment. Well probably wait about six weeks to cement the crowns and that bridge. But after she puts the abutments into place, were going to actually torque the prosthetic abutments down to 35 Newton. So were not going to take this off again. Theyre going to be back there. So when you do prep these abutments just make sure you get any sharp edges off cause that can irritate the tongue. One quick trick is to give the patient a bunch of orthodontic wax. Therefore, if those abutments are tender to the tongue cause theyre not used to having a tooth in that area they can pack it full of wax and were in good shape. Often times when putting the abutments back into place theres tissue impingement. So what you want to be real careful of initially is making a long enough mini envelop incision and reflecting enough tissue. You see how the keratinized tissues form a nice cuff around that implant, thats exactly what were looking for. If you dont make enough of an incision from mesial to distal that cuff wont displace like that. So were going to tighten these abutments on here and then were going to double check that with a 35 Newton breakaway torque. So weve done this and well double check the torque with a 35 Newton breakaway torque. There we go. That broke it 35 for the distal abutment. And we will do the same on the mesial. Reengage it. All right. So were about 30 right there which should be sufficient. The implant started moving. So we stop at 30. So we got our preps back here. These are both single unit and then we have a bridge right here. We are going to go ahead and correct any angulation with the bulk reduction. So, on this distal abutment I kind of correct that buccal angulation by taking off some of the lingual of the abutment. And were going to smooth any rough corner, round those off, make it easier for the lab. Labs can sometimes break off any sharp corner filling around those. Good. Thats a good general shape for the abutments. So were just going trough just slightly around this and place Expasyl and well be ready for our impression. Okay. Ready for impression. And what were going to do is place some wax in the holes of the top of this after we place our Expasyl retraction. So you can see we have very little bleeding there. Expasyl retraction in place. Go ahead and place the wax on the holes of the top of the abutments. Go ahead and open. Last check. Were going to take a look at his bite. Go ahead and bite down. Weve got a good class one bite on this side but of course on this side weve got a crossbite as witness by our friend no. 19 here. Yup, just hold biting. Just like that. Weve got good clearance on both our implant. Weve got good clearance on our crown and bridge here. I may just take off a little more of the buccal of our friend here and try and correct that crossbite slightly. This will be in for aesthetic in. Go ahead and open and close down again. So this case is a great example of being able to complete crown and bridge procedures seamless with implants in the same appointment and maintaining a similar seat date for everything. So even though we can seat this bridge in three weeks were going to wait a good two months to seat the final implant work. So well just wait the full two months to seat everything. We were going to temporize the bridge but as far as the implant goes were not going to put temporary crowns on top of those. And so well leave those abutments in place and we should be in really good shape. All right, Kelly I think were good to go. And Im going to prep this just a little more on the buccal. And then make sure there are no metal pieces around where those implants are. They will integrate with the gums and can cause something like an amalgam tattoo. It looks like were very clean there. So were okay. So were going to take a full lower arc impression here and take a Blue Mousse right after that. Standard impression technique. Well be taking impressions for both of the implant and the bridge. Excellent were using fast set today. Go one bite down if you would. All the way down. Yup, perfect bite hole just like that. Hold just like that. And Kelly would be finishing up by taking upper impression. Actually, I should say we will be finishing up by taking an upper impression and we got the Blue Mousse and well just pick a shade. I think A2 will be our shade today. So its a great example of crown and bridge mix with implants but also taking final prosthetics for the implants at the same time as placement. All right, so we finished up this case where we placed a couple of implants, took the impressions for those implants, and also did a three unit bridge at the same time kind of demonstrating how efficient implants can also tie right into crown and bridge dentistry that youre doing. Heres the final [panel] with the implants. We place 4.7 x 8 on the lower left, no. 18. Our nerves right here. So we follow the 6mm rule roughly. Id say thats about 4-4.5mm. If this is 8, now were close to about 6. We still want to give the mental foramen its proper distance. So were about 4-4.5mm from the mental foramen. We could go with a longer implant but why go with longer implant 10mm is perfectly fine. Great success. And were only using it to support one tooth. So that case is completed. We actually did the final impression today as well. And so were going to be restoring this entire quadrant and then some in that particular procedure. |

 FAGD/MAGD Credit Approval does not imply acceptance by a state or provincial board of dentistry or AGD endorsement 7/31/2018 to 7/31/2021 Provider ID# 317928
 Submitting...