Learn From the Dental Industry's TOP LEADERS!
Sit Chairside withDr. Dennis WellsCreator ofDURAthin® Prepless Veneers- OR -
|
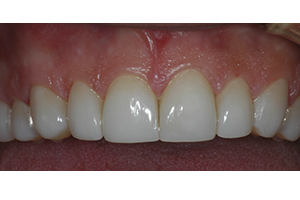
The Principles of Advanced Minimally-Invasive Dentistry.Part 4 - Dr. Michael Miyasaki seats the Pearlfect veneers
Instructors:
Dr. Michael Miyasaki demonstrates the technique for seating the Pearlfect veneers.
So right now what we’re going to do is we’re just going to do a try in of the restorations to make sure that they all fit nicely against the tooth structure. And the nice thing about these veneers is unlike some lose fitting veneers that are this minimal prep, these have a very tight context. So when you put them on the teeth even though they are only on the facial surface of the teeth, they don’t slide around a whole lot. So there we are with the try in. Everything fits really nice and you know they’re nice, thin and small. They’re staying on the teeth because they’ve been custom made for each tooth. All right. What I like to is just make sure that the teeth don’t have any kind plaque on them or any kind of stain or debris left behind. So I just have to go gently back either of the teeth with sandpaper disc. The sandpaper disc just kind of roughened the surface to give us a nice etch or just go over the teeth gently with little slurry of pumice. Try to avoid anything that has fluoride on it that can inhibit our bond. Actually all that I’m using are the Cordless Prophy unit that I’m using right now is Discus Zen unit which I actually like cause there’s no cords. So ergonomically we’re not constrained by any type of cord and its battery powered. So you can just go over the teeth and clean them and rinse thoroughly. And if you were concerned that there might be some food or debris between the teeth, it be prevalent to go back and floss. So we’ll do that. So what we’re doing right now is we’re going to flossing inter proximately after we rinse the teeth to make sure there’s no pumice or polish in between the teeth. And just make sure there’s no food in between the teeth that could prevent us from getting a good bond. And one of the important thing is you know when you work with the patient is you want to make sure they have good gingival health before you try to bond any kind of restoration in because while you’re working on their teeth if you gently touch the gingival and it begins to bleed it’s going to make the bonding process almost impossible. The perfect candidate I think for the Pearlfect technique is the patient that has maybe a little bit of staining. Maybe they’ve tried to whiten their teeth and they’re tired of having to wear bleaching trays over and over and over. So they want something that’s more permanent to give them that nice white smile. They might have a little bit of wear on their teeth. You know not a lot and that just goes with any veneer system. If the patient has a lot of wear and teeth on their bite edges of their teeth then that might be a case that we have to consider some occusal issues before we just go ahead and restore them. So a patient that has darkened teeth, teeth that are maybe tilted backwards, the back of the mouth we called it lingualized not flared out because we will be adding material to the facial buccals of these teeth building them out a little bit. And if the teeth tight back a little bit again that’s ideal. And so lingualized teeth, slightly darken teeth without a lot of wear. So what we’re going to do is we’re going to go in and start the bonding process. The critical part is just isolating the teeth well with cheek retractors. We’re not going to use a rubber dam. We’re going to apply the etching to the teeth and because we’re etching to enamel, we’re going to go ahead and etch for 15 to 20 seconds and then we’ll rinse it off. But again it’s much different than trying to bond a dentin. You know dentin I want to make sure I don’t want to over-etch. So I’m going to put the etching now for 10 second and rinse it off for sure. With enamel if we go a little bit over, we’re not going to run the chance of sensitivity. So it’s much easier to do this procedure than any that involve with a prep veneer. So what I’m going to do real quick is I’m going to put some Mylar strips distal to the second bicuspids. Since we’re bonding from second bicuspid, the second bicuspid when I put the etching on that will prevent the etching from getting on the mesial of the first molar, it’s going to made the clean up much easier. So now what we’re going to do is we’re going to apply a little bit of etching to the teeth. We’re going to spread this out really well. Again, so nice working with enamel and not having to worry about dental sensitivity. I think the key part when you do this is make sure you get it all over the teeth. We don’t need them on the occlusal surfaces, just barely wrapping over the buccal cusp. Especially make sure you get the distal that second by and that’s why you got the mylar strip back there cause you can really squeeze it down into those embrasures and not have to worry about over-etching the molars which is going to make clean up so much harder. I’m trying to make this job easy. All right we’re going to rinse that off. So now we have the nice frosty appearance of the teeth. We’re going to place total-etch primer and adhesive system. This is Moxie from Discus. We’re going to coat the teeth real thoroughly with this. The nice thing about this is it’s a primary adhesive with a very thin film thickness especially working this light if these were to begin to set up before I could thin it with air. I wouldn’t have to worry about the restorations fitting or not. So the nice thing about using a system like this, one of the important parts about using a system like this is to let soak in so for about 20 seconds then I’m going to thin it out and then I’m going to place on the other side of the arc. All right. So now we’re going to thin that out. Just gently there. Quickly let’s go ahead and cure that. Seal the enamel up passed the size of the teeth. I think this Pearlfect system is actually the marriage again of the best of materials with the ease of technique. Because in the past I’ve done both minimal prep and no prep porcelain veneers. And the hard part with that was you’re taking porcelain and have to thin it down to knife edge. You always have to worry about the porcelain itself fracturing because we were taking it down to kind of that minimal, minimal thickness both in the body of the restoration and at the gingival margin. Well then you look at the general before that where in order to be a little bit more careful they would leave the gingival thicker so the clinician would then seek the restoration and have to go back and finish the gingival margin to that knife-edge so you have imperceptible margin between the tooth and your porcelain but that was hard to do. If you ever have to adjust the occlusal surface of a porcelain crown, you know how difficult it is to adjust porcelain. Trying to do that with gingival margin while trying also not nick the root and then have to go back and then pause that up is one of the reasons why I think the prepless porcelain veneers got such a bad wrap. It was just a very hard procedure for all of us as clinician to go back in there and then do a proper finishing job. What Pearlfect does by using a material that’s durable, stain-resistant, maintains a polish and yet is easier to finish just makes the job so much easier. It’s inherently stronger so you can have a knife-edge at the gingival margin. And if you do have to do any kind of finishing you can go back in there finish it off very easily, polish it up back up and you’re set and ready to go. So what we’ve done is we’ve etched the teeth. We’ve rinsed them off. We place primary adhesive. We gently thin the primary adhesive out, the Moxie. We’ve cured it now we are going to use the Nexus cement using a clear shade of cement and we’re going to place the restoration in. All right. So the important thing is we place this into the mouth is that we know we got it on the right tooth. So if I have any kind of question about which restoration I’m placing, I’ll go and ask the assistant just to verify that we place tooth no. 9 and not no. 8. And then once we have that in place, we’ll just gently begin to wipe off the excess cement. You can see with this overhead light, it’s already starting to set up. And I guess one of the things that we should mention is we place this restorations on the teeth. We don’t want to press too hard cause they are thin. And the strength will come once we cure the rooting cement. It’s very cool as these are so nice and thin. As I’m placing them I can actually see the cement. Just kind of bear down on the two surfaces giving us that contact lens effect. This instrument I’m using right here is just a butler rubber tip. It’s one of my favorite just to remove the excess cement. As you can see I can just trace the line between the restoration of the gums, remove that excess. And if for some reason there was a little void I envisioned that it just allow the cement to flow into that void. Taking a little gauze here just wiping off the excess cement. On teeth no. 7 or no. 9 and no. 10, on teeth n0. 9 and no. 10 the camera light actually set our cement really quick. We have them all the way down. And because that marginal fit is so good that the cement is hard. I’m just going to wipe off this flash. Let’s just get rid of it. We’re going to use the FlashLite Magna again and what I’m going to do is I’m just going to cure the cervical. So I’m just tacking each one down at the cervical about 2 to 3 seconds. This is a FlashLite Magna with a tacking tip on. The reason why I like to cure there cause if I’m going to get any kind of bleeding or cervical sulcular crevicular fluids coming out is right at the gingival. So I just push the restorations firmly towards the lingual to seat them. So if we quickly were to review the procedure what we did is we got in there. I just briefly quickly clean the teeth. You know one of the things I don’t like to do as far as tooth cleaning is use too much polish or pumice and how that get into the embrasures or risk causing kind of gingival irritation that would cause bleeding during the insertions. So it’s just a very quick cleaning, roughing of the two surface to give me a better etch. Then the try in. Try in with other water or try in gel depending on the clinician’s preference just so we can be sure that we’ve got good marginal integrity that the patient’s approves the color and we like the shape of the teeth. The shape can always be adjusted once the restorations are in and the restorations can then be polished up very easily. Then we went in, remove the restoration, clean everything, rinse the internal of the restorations out, silonated the internal surface. Again, we put that coupling agents. We got a good bond between our restoration and composite resin cement. I went back over the teeth, clean them. Just rinse off the try in gel. Did the cheek retractors. Did the acid etch. Rinse the acid etch off. Again you want to make sure you get a very good etch in all over the nooks and crannies of the teeth. You don’t have to get the lingual surface to make your clean up easier. And then we put our primary adhesive on, thin that out gently. Did a very quick light cure just to seal everything up. Place the restorations ten at a time with the clear eluting cement on the internal surface. Press them all down. Now typically what we do is tack it at the gingival just to make sure that they’re secure. Go ahead and floss in between so that would be quick in your clean up. And then basically wipe off all the gingival excess, do your final cure. One of the things that we have because of all the lights and Magnavu is we have a lot of quick curing over the composite so we have a little bit more scraping to do at the very end. But typically in most clinical cases you won’t have that. And then just very quick adjustment of the bite. Most the occlusion are still on the natural tooth structure so we’re not going to have a lot of post insertion adjustments to do. It’s that easy. |

 FAGD/MAGD Credit Approval does not imply acceptance by a state or provincial board of dentistry or AGD endorsement 7/31/2018 to 7/31/2021 Provider ID# 317928
 Submitting...