Learn From the Dental Industry's TOP LEADERS!
Sit Chairside withDr. Dennis WellsCreator ofDURAthin® Prepless Veneers- OR -
|
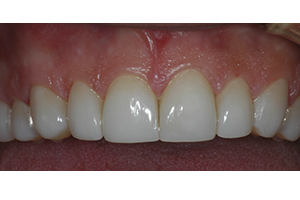
The Principles of Advanced Minimally-Invasive Dentistry.Part 1 - Dr. Michael Miyasaki gives you an overview of Pearlfect veneers
Instructors:
Dr Miyasaki reviews Pearlfect veneers and demonstrates how to take an accurate impression.
I think those procedures are exciting evolution of what we’ve been doing for the last 20+ years. In the past, we’ve had veneers that were thin but we always did a little bit of preparation trying to stain the enamel and we always have to worry about those veneers breaking, and they were very abrasive to the opposing dentition. Then we kind of went in to this press ceramic restoration where we found if we took a little bit of tooth away we could actually get the strength and the characterization built-in by the lab but we were taking tooth structure away. Unfortunately, we have dentin binding agents that were being developed so we’re able to take the enamel away, bond to the dentin successful. But today the evolution is we’re all trying to be more conservation whether it be knee surgery trying to use arthroscopic surgical procedures so that’s less invasive or any kind of stent in the heart. And now we’re trying to be very conservative in the way that we do any type of surgery and veneers just kind of fall in that. So it’s win-win. You know I as a clinician have a patient that’s going to be more comfortable. The patient is going to be more comfortable in the chair while I treat the patient. We’re going to get the procedure done quicker. I think they’ll have a great final result. And that way as a clinician I can actually keep the cost down to the patient. If I can keep the cost down to the patient then hopefully we’ll have more patients that say yes. Actually I like the shape of my teeth so I wouldn’t want that to change but yeah definitely the color of my teeth. One of the more critical parts of fabricating this Pearlfect veneer is an accurate impression. And this impression not only has to capture the details of the teeth but actually we want to capture the sulcular area. So the way that we do that is we’re going to take a heavy body material place in the tray, place the tray in the patient’s mouth. Let that come to full set. Remove the tray then reline around the sulculars of the teeth where the teeth fit into the impression with an extra light body impression material. We’re then going to reinsert the tray with heavy pressure from pressure pushing all that extra light body material up into the sulcus areas. We’re going to let that extra light body impression material come to full set then again extra the tray. So there’s going to multiple times that we’re removing the tray from the patient’s mouth. And one of the things that we don’t want to have happen is we don’t to have the impression material pulling away from the tray itself. So there are two things. One we’re using the perfect tray which I like cause it’s clear. So when I seat the trays I can see where the teeth are in relationship to the tray to make sure I don’t bottom out on the tray or rub an edge. Cause a lot of times we’ll hit the facial or the buccal of the tray with our teeth and get a distortion that we can’t see until the tray is removed. The other thing I want to do is I want to make sure that we use a tray adhesive. So we’re going to paint both the upper and lower trays with the tray adhesive. The lower tray what I’d do, this is just our opposing model. And I’ll just use a medium body kind of a monophase technique to get the impression of the lower teeth. And then on the upper, we’re going to paint the tray adhesive there to get the heavy body and then relining that with the extra light body material. So we’re going to paint the adhesive into the trays. And we’ve tried the trays in to make sure that they fit properly into the patient’s mouth extending all the way beyond the distal last tooth in the arc and fitting comfortably around the buccal facial aspects of the teeth so we don’t hit the tray during placement. So we place adhesive in both upper and lower trays. We’re going to let that adhesive set for about 5 minutes until its nice and tacky then we’ll go ahead and take the impression. One of the things that you’ll see is that the critical part of the [Pro-Fit technique] is going to be the impression. Because we’re not placing a prep finish line or margin at the bur. So what we’re going to do is we’re going to have to get the lab a lot of the details in the cervical area of the tooth and we’re going to use a two step technique. One where we just capture the soft tissue, hard tissue positions with the heavy body material. Then we’re going to use an extra light material and the hydraulic forces created by that first impression in the tray will force the extra light body material up into the sulcus. And by following that technique, . This would be much comfortable with the patient, much easier for the clinician. But we’re going to be able to communicate with the lab, the details and show them the emergence profile slightly subgingival so they can follow those contours up to create that further margin. And therefore when we’re done, we shouldn’t have any cervical finishing to do. The other part of the Pearlfect system is basically the techniques of achieving the impression, perfect impression and the bonding mechanism that will prevent you from spending hours be frustrated, frustrated your patient and cause you a lot of chair time. It is a method that will show you how to bond 10 veneers in place within 30 to 45 minutes and having a great experience with that. So what we’re going to do is we’re going to go ahead and take our lower opposing model. Again, I used a medium body. I’m using precision. It’s a polyvinyl siloxane material, medium body, lower tray that’s been painted with the adhesive. And again just for the opposing dentition, the opposing impression. Sorry. Open. And then you’re just going to seat that down the long axis of the teeth and with that clear trick make sure I don’t hit the buccal facials of the teeth then we’ll just hold that both side. So we have a nice impression with all the details in the lower portion. So now we’re going to the maxillary impression. Again this is where we’re going for the maximum detail. So we’ve got Moshe who’s going to load the tray that has the adhesive on it. And he’s going to load the upper tray with the heavy body impression material. I’m going to take, I’m just going to have him open. I’m just going to dry the teeth. And then we’ll seat the tray once Moshe has it filled. Then I got to seat the tray vertically forcing that material up around the teeth to get a nice tight fit. We’re after the sulcular details. So he’s doing a nice job. What he’s doing is he’s putting the majority of the material where the teeth are going to fit in the tray not so much in the palate, which will decrease the amount of material going towards back in the mouth. So bite that. Open big. All right. I’m just going to hold that tray there firmly so it’s not moving around. And this material is going to set in about 3 minutes. All right. So we’re just going to remove the tray. This is the set heavy body material. All right. So what we’re doing right now is we’ve got this heavy body and Moshe is just adding the extra light body material around the cervical areas and then we’re going to reinsert the tray back into our patient’s mouth here. It’s not easy to do cause I’m holding right in front of the camera and Moshe is having to try to figure out where he is. All right. So I’m going to have you open real quick. Thanks. I’m just going to dry the teeth again. And I’m going to seat and you have open big. Thanks. And we’re just going to put lot of pressure up. Okay. And then we’re going to let it relax. So now this reline heavy body material reline with the extra light body is ready to be removed. I got a nice tight seal and suction there. And there you go with that detail. Now that’s what’s going to help the lab make some nice Pearlfect. Of all the veneer techniques that I’ve tried over the years from prep veneers to the no prep porcelain veneers marketed by some of the other companies I think the Pearlfect system lends itself to ease of use by any clinician. You know you don’t have to be world renown esthetic dentist to be able to Pearlfect veneers nicely. Basically the system is taking out all the challenges. You don’t have to worry about the dentin bonding which has always been difficult. You don’t have to worry about temporary. You don’t have to worry about anesthesia. The lab, a good high quality lab is fabricating these restorations so there’s very little need to do any kind of re-contour or adjustment to the shape of the veneers once they’ve been bonded to the patient’s teeth. |

 FAGD/MAGD Credit Approval does not imply acceptance by a state or provincial board of dentistry or AGD endorsement 7/31/2018 to 7/31/2021 Provider ID# 317928
 Submitting...