Learn From the Dental Industry's TOP LEADERS!
Sit Chairside withDr. Dennis WellsCreator ofDURAthin® Prepless Veneers- OR -
|
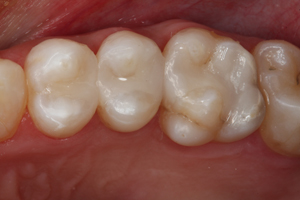
Direct Posterior Resin RestorationsPart 2 - Direct Posterior Resin Restoration of distal and mesial of molarOkay. We have removed the amalgam, the affected tooth structure. There was some recurrent decay and I'm going to just take a micro-etcher and I'm going to just clean up these preps a little bit. All right. What I have done is just place a dead-soft matrix on the distal aspects of this first molar where I have that slight penetration in the distal wall there so that I can confine the composite. Now just place a strip and the little wedge there, that's just to confine the composite.
Now the secret to contacts on composite is the matrix system. We're going to use Garrison's matrix system. The thing about composite, proximal composites in the posterior it's very difficult to get more than one contact at a time. So I'm going to build each contact separately. I'm going start with the molar. We're going to use one of these sectional matrix bands and these sectional matrix bands actually have the contour of the proximal contact that you want. You see they're contoured so just like the tooth. We're going to place it on the mesial aspect and get my finger out of your way. Now the rings again are what actually will cause the separation of the teeth. The thing I like about this one by Garrison is you see it has a place for the wedge to go through. You can fit that right over the wedge. Beautiful. Now take a black spoon and the black spoon I used simply to make sure that I have a rounded surface here on the proximal contour. They're just burnish a little bit. We're going to use a self-etching bonding agent. That's a seventh generation. Everything is in one bottle including the etch to primer and bond. What we're going to be using here is ALL-BOND SE, self-etch. So you want to completely saturate the tooth with it. You can't use too much bonding agent. And we're going to thoroughly dry to remove the carrier and any residual water leaving the bonding agent. At this point, we're going to light cure that bonding agent for 10 seconds. I like to use a flowable base on all of my direct composites so that we get a very good seal to the tooth structure. It fills in all the nooks and crannies, seals the margins, gets a very good tight margin and act as a base on the dentin keeping any pull back from the larger materials so we don't have any biting sensitivity and a very good seal. We're going to use the N'Durance Dimer Flow material and we're going to just inject it into the floor of the cavity preparation. We're going to use an explorer now to just manipulate the material and help it flow into the corners along the base of the tooth and form an excellence seal. And then we're going to light cure the flowable base. Now that establishes the bond at over 2000 pounds per square inch to the tooth. We can expect that that material is going to act as an excellent seal and is actually bonded to the tooth structure. From this point, we're going to build our restorative composite and this N'Durance composite. And we're just going to condense into the tooth a bit. It has a thixotropic property which means just slight manipulation and it will flow where you want it to go. Now we dampened down the lights a bit just so that we'll have more working time. But I place that initial increment and then we're going to light cure that increment. All right now we're going to add, we placed the basic dentin shade down and we're going to add in incisal color just to get more vitality like a natural tooth. After a brief cure, Dr. Nash will continue with the procedure. So there's the finished placed restoration. We're going to remove now the matrix band and the matrix holders and we're going to do our final contouring. This is small ET3 carbide bur by Brasseler used just to fine-tune my margins. All right at this point, I've taken #12 surgical blade which is a wonderful instrument for what we're doing here and just going into the interproximal in it, that will remove any little overhang beyond the margin. It's a great instrument for that. We're going to use an enhanced disc just to polish lightly in the interproximal area here. |

 FAGD/MAGD Credit Approval does not imply acceptance by a state or provincial board of dentistry or AGD endorsement 7/31/2018 to 7/31/2021 Provider ID# 317928
 Submitting...