Learn From the Dental Industry's TOP LEADERS!

Sit Chairside with
Dr. Dennis Wells
Creator of
DURAthin® Prepless Veneers
- OR -
Larry Rosenthal
Sonia Leziy
Michael Koczarski
Henry Gremillion
JUST TO NAME A FEW!
Register for a PREMIUM membership and learn from the best in the industry!
|
Making Smile Design Profitable, Efficient and Predictable
Part 3 - Completion of the preparations and taking a good impression; utilizing your assistant.
Instructors:
Trent Smallwood, DDS
Trent Smallwood, DDS
Trent W. Smallwood, DDS, founded the Centre for Contemporary Dental Concepts in Tempe, Arizona in 1997. An International Speaker, Dr. Smallwood has spoken at Prestigious Venues such as the ADA, AACD, ACE, London Society, India, and throughout the country at state conventions.
In this section of the dental CE course, Dr. Trent Smallwood demonstrates the completion of the preparations and demonstrates taking an accurate impression.
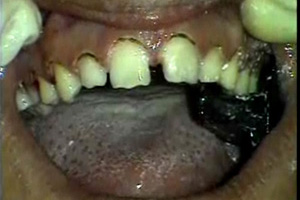
Now just finishing out the right side, mirroring what was done on the left. We will put the final step on our pre-molars and Michael is going to love it because he is not going to get his chicken sandwich caught between his teeth anymore. Now as one can see between 5 and 6 we have a diastema that was there preexisting, so I will be extending that further lingual and widening the margins slightly to be able to let the ceramist build more ceramics, build the ceramics to that point. Now if the patient ends up having an amalgam or an old filling on the occlusal surface I will go ahead and wrap the veneer into that position as well, in this case we Michael does not have that so we will not be. Now looking at all the teeth we have good axial inclination all the way down to the belly button so our position is very good, I am going to drop the margins between 8 and 9 just a little bit more to again be able to give the ceramist all sorts of feel, Michael I know you love how those things feel. Now because we will be closing the space between 8 and 9 and because it is fairly large we need to actually do little slenderizing on the distal of 8 and 9 that's what we are going to be doing here. With any diastema case we always need to do some root and tooth slenderizing and we will reduce the distal inward towards the mesial actually make the margin fairly thick in this area and taking as our final our mosquito tip burr and just slenderizing this root a little bit, usually somewhere around a millimeter, as a result this will slenderize the root tremendously and we have a nice distribution of space and the proportions as such to where we will be able to build the ceramics ideally.
This is the friction grip Shofu point rubber impregnated that will just polish the preparations of any sharp edges that we can't see so well and it kind of let's the ceramist know that if our preparations are polished, then, we're pretty serious about the work that we do and so simply running the polisher over these will tend to make them very smooth. Again, this type of burr does not cut it just simply polishes and I run it over along all the preparation as well as the margin just to make sure that there is no sharp spots. Dr. Smallwood will continue to polish the teeth and then move onto the impression phase. The first aspect of taking an impression is placing two cotton rolls, we are then going to be drying off the tissue,Michael forgive me here I am going to dry you off real good,and open just a little wider, and we immediately start to inject, and then Amanda will start to fill. Then I start to air off the impressions, to get this impression, the injectable,very thin. Open just a little wider, and don't bite down Michael I will take care of everything just relax that lip, we will fully seat, pull the lips out fully, make sure we are fully seated and then, Michael, put your chin down a little bit and go ahead and give me a big kiss Michael, good, and a little bit harder with the lip, good and just relax. This will be able to hold a good impression and then we will be able to come in and hold very good. Here we will begin to pull the impression after about a three minute set time, and as we can see, very nice impression with good marginal integrity through out,slight burn on tooth number eight but that is not going t be factor at all, no voids, this is a great impression. Now using the Finesse shade guide we are going to be able to look at the preparation shade at this aspect and looking at these, and looking at these, Amanda, give me you impression too. F12, ahead and F1 and Amanda is always right. So I want to go with Amanda on this one. What we are going to do is I am going to go ahead and have her hold that in position in the same plane, right in this position as I take a picture of that. Very good. The third phase is the provisional phase, with the provisional phase we look at creating an environment based on the prototype and the wax up or the mock up, whichever we have used to be able to go to the next level in regard to taking this prototype and actually implementing it into the mouth and seeing how it all looks. We may like what we see or we may want to make some changes to what we see. But this is critical to be able to complete, again in an efficient manner, to create a provisional within the mouth in my case in about 10 to 15 minutes it usually takes me with a full incisal translucency placed so that the patient can get a feel and an idea of running with with that that prototype so they can tell us what they like or dislike about the process and what they've got in their mouth. Plus, I can look at it and ascertain whether there are some changes that I might want to change. I will tell you out of my experience that probably 17 out of 20 patients will not want to change a thing but I will notice some nuisances, for example maybe the central incisors are about a half a millimeter to long. They may think they are fine and what I will do is tend-to buzz those two teeth down and have the patient look and invariably they will say, I like it better. Because we as dentists and doctors have to be able to mold our patients along the way. You may think, well don't touch it if she loves it, don't mess with it, well I say we have got to have it ideal. Because if she likes it and then all of a sudden we put these teeth in a few weeks later and she goes home and her husband Bob says, what is up with you big front teeth, and she loved them, she is going to be back the next day saying, "I don't like them." It is important for us to be able to mull all the way through, so I will tell you that probably 10 to 15% of the time I will make changes, make sure the patient is O.K. with them and then we will move forward.
|
 FAGD/MAGD Credit Approval does not imply acceptance by a state or provincial board of dentistry or AGD endorsement 7/31/2018 to 7/31/2021 Provider ID# 317928
 Submitting...