Learn From the Dental Industry's TOP LEADERS!
Sit Chairside withDr. Dennis WellsCreator ofDURAthin® Prepless Veneers- OR -
|
Building the Bridge from Dentist to Ceramist: Why Communication Matters Part IIPart 1 - Anterior build up continues to take shape.
Instructors:
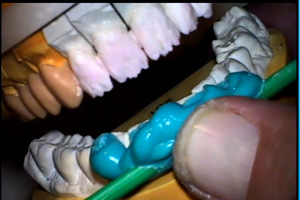
Lab technician Matt Roberts continues to build up the anterior restorations.
So we need to add a little bit of length to #9 and distilize # 11 just a little bit. Oops! A little wet. I hate it when that happens. That's O.K. All in good fun. Since half of the incisal edge stayed in the matrix there because it was too wet, we'll replace that and this needs to be distilized just a little bit. I'm not going to build beyond this point because I want to fire at once and get everything really well adhered to the refractory die. Awash bake would be the normal procedure on this since simply in the process of filming, I didn't do it. So we're stopping the dentin bake a little bit sooner. So we don't have a huge volume of porcelain being fired. We'll get this to the margins there and we'll go ahead and take these out now and fire them. After a few minutes in the oven we are for a few minutes in the oven, we're ready for our next layer. What you'll notice here Great. What you will notice here is that we did get quite a bit of tearing and pulling up from margins. The reason we got that is that I didn't do a wash bake on my refractory when I first started, and that's something I usually do but it was all the excitement of filming and film crew, I got distracted and forgot to do it. So we'll go ahead and fill those in and it won't be a problem in the long run at all, everything will fill right back in. But normally there would be a thin wash bake that would be fired and then the initial dentin bake would be placed. The good news is, is we controlled our volume of shrinkage by having a pretty big build up here that shrunk back a little bit. Now our incisal affects, when we start putting them in, won't move nearly as much on the initial firing, so there's a plus and minus out of that. I want to be careful when I'm filling these little gaps in. Like here, there's quite a few tear lines, I want to make sure I'm using exactly the same porcelain. Where I didn't do any laying last time,it's all the bleach shade which is a little bit of dilution of translucent. So there's not a question what it is. If we had complex layering on the case and it had done that much tearing we could end up with optical effects from that, as is we should be able to fill the little tears in. I'll seal up on subsequent bakes and we should be O.K. You do have a system. I start with my dentins and I move to my incisals, my white incisals there and I also laid my bottles out where I know for instance of those three incisals, the N3 is on the left, the E5 is on the top one and the N4 is on the right. So I leave my bottles set up in the same pattern as my tray. Otherwise I get half way through a case and I totally forget what the heck I was doing. It's also once you start doing a big build up, it's really easy to lose track of what you have or haven't done. The manufacturers do color code the porcelain, for instance the dentin has a slight pinkish hew to you and the incisor porcelain, some of the incisor porcelain have a little bit of bluish hew to it, that's just a color tag that burns out as the porcelain's fired, it doesn't affect the shade at all, it just helps to keep track. But when you get into a half a dozen different colors of incisals and effects, it's real easy to try to remember if you put the mesial mammalon effect on tooth #8 or was that in # 9. O.K. so now let's look and see where we are at and rather than moving the articulator, I'm going to move the scope. See where we are heading. So we're not in bad shape, we're actually doing a lot better than what I thought we were going to be there. Good. What I want to do now. I think I'm a little short on tooth #9 but I want to check my stick bite and verify that. We always use multiple cross checks because if we had let's say the articulation of this was a tiny bit off between the temporary model and my prep model, if we missed that just just a little bit. That could make me make a shorter veneer and out of position veneer if I only looked at the incisal edge matrix so I'll come back and look at my stick bite as well. I'll try to scoot this over underneath the camera because what I saw in the matrix agrees what I'm seeing in the stick bite. Even though when I look at this, this looks like a pretty nice build up, everything looks pretty good in my hand. If you take that and put it here and put our stick in place and come over here, let's see if we can put this on here. And then we close down. What we see is that my whole smile line is canting a little bit in # 9;it's actually quite a bit short from where we would like to have it. And we would also have a cantered mid-line if we went like that so it's really easy to lose perspective of what is horizontal in the face and that's why we have tools like the stick bite and we have a photo of the patient with this in her mouth that we can look at also that shows the stick bite is valid so we know that it's a the incisal good horizontal plane. Now I know I need to add to my dentin lobes on # 9 and # 10 to bring them up to that height. And we're seeing exactly the same thing on the incisal matrix, I'll show you that now. So when I close into this, I'm not fully closing because I don't want to mess up my lobes but what I was seeing is that 7 and 8 are starting to bottom out and I'm building them just a little bit longer then the cuspid anyway over there because they are going to shrink. But those are in the right position but 9 is relatively shorter so is 10 so we'll come back and lengthen 9 and 10 before we start doing our enamel layering. And then the fun will begin, we'll start doing all the fun enamel effects and mammalon effects. So now we have to develop a strategy to make a nice looking incisal for this. We're mimicking any thing necessarily other than the lower arch. Tom said he did want some translucency for this patient some type of look of a natural tooth across here just not the real bony white. So we're going to use some fairly high value enamel lobes on the mesial and distal intersperse those with some blue white lobes and we'll use also some fairly blue materials. So in my incisal I may use a little bit of the ice, I may use a little bit of the 1N for my opalescent materials. What I want to do is take some of the material that's called ice; I'll show you that again just to remind everybody what it looks like, if I can find the shade tablet that it's on. Here you go. Ice which is a little blue grayish, very translucent and then the 1N is also very opalescent and not quite as gray as clear as the ice. So for our translucency surrounding our dental lobes and we're going to start and put just a little bit of this blue white ice down in through here on each tooth. And a little more of it right here and a little bit of it back here through the interproximal. A little bit on the mesial lateral and a little bit more on the distal lateral, that should give us a real punchy looking mesial and distal. I'll throw some little flecks in the middle too. I may give a little bit of color in the middle although not much because this is a fairly bright shade patient and as dental professionals we all know there's quite a bit of yellow and amber that happens out in this portion of the tooth. Every time I do that on a bleach patient, the patient comes back with a mirror and a magnifying glass and said, "What is this yellow thing in my tooth" So we'll resist the urge to put too much of that in. We'll make it look natural by just artificially, excuse me, by alternating the opacity levels and the brightness levels across the incisal edge and keep it more of a blue white translucency than a yellow or amber translucency that we see in natural teeth, make it look like a post bleaching tooth. Let's come back with a little bit of the N1 and use that for translucency in between lobes here. It's not as quite as dynamically as translucent as the ice is, it's still fairly translucent. We're going to see that effect a little bit, I'm not going to use it every where, I'm just going to use it in a few select little areas here. I want to have subtle translucency when I get done. Right now I'm using some pretty clear materials, a pretty bright white materials, which is going to make a very distinct demarkation line and I'm going to come back here in a minute and I'm going to diffuse that situation by just using some E1 and a couple of other materials that are not quite as clear. I'm not filling in or filling around my dentin lobes completely because I don't want again to create that sharp of a transition. I just want to get a little bit of variability and translucency in this incisal third. This is just E1 and what I'm trying to do now is kind of build a two dimensional silhouette of what I want the final tooth to look like. Facial lingually it's going to be a little thin and this will be the palette that we'll put our mammal on effects on. It will be the final controller of our incisal translucency. |
 FAGD/MAGD Credit Approval does not imply acceptance by a state or provincial board of dentistry or AGD endorsement 7/31/2018 to 7/31/2021 Provider ID# 317928
 Submitting...